Heirloom Baby Blanket Crochet Pattern
Learn how to make this beautiful, modern Heirloom Baby Blanket Crochet Pattern. With a video tutorial and written instructions, you’ll be able to make this blanket in no time!
Not looking to make a beautiful gift for an expecting mother? Crochet this afghan in any of 6 sizes following the instructions below.
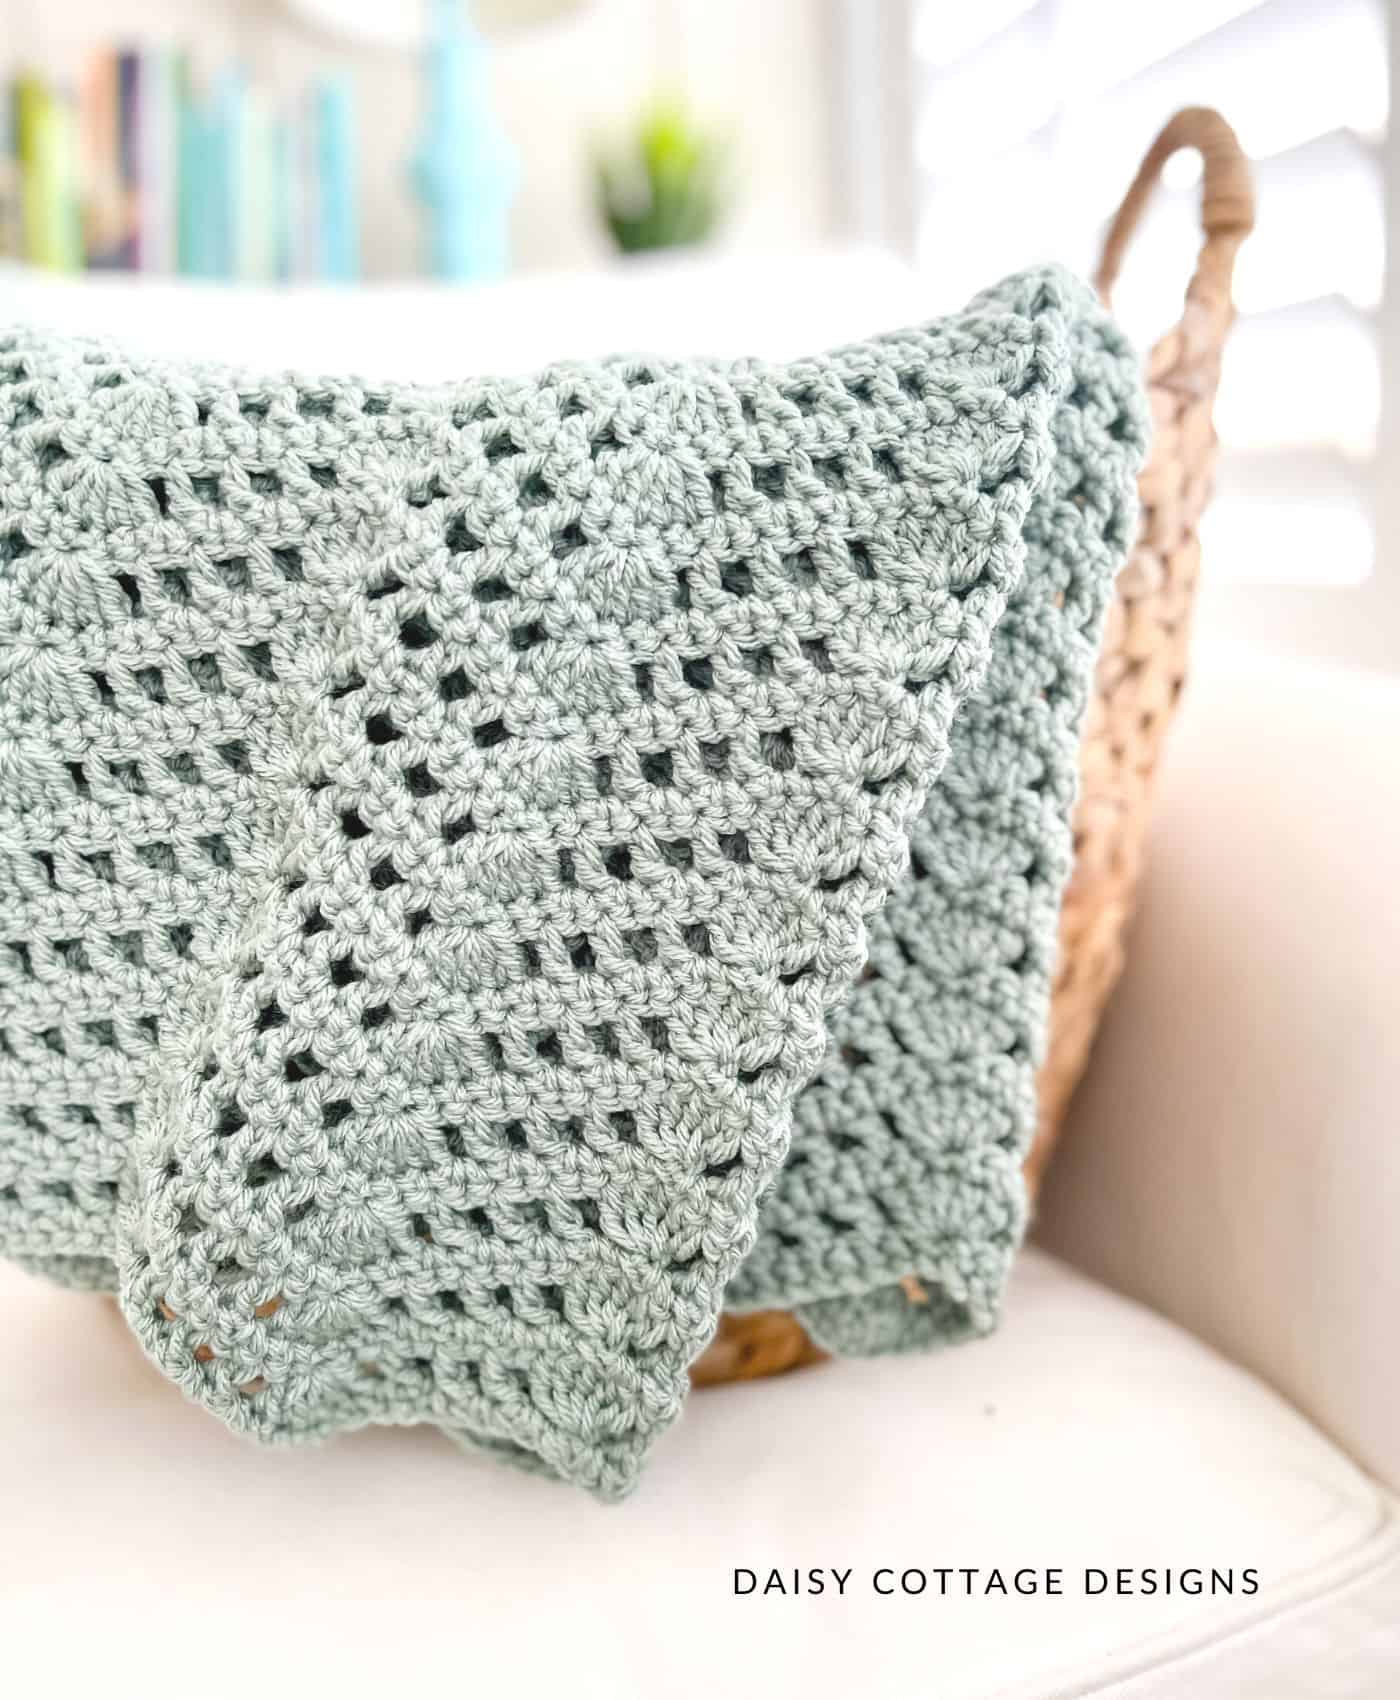
I love making baby blankets and I always have. They were some of my very first projects and I’m still proud of those labors of love.
I think one of the reasons I enjoy making baby blankets is because it can be an instant heirloom. Handmade items are often treasured for a lifetime; passed down from generation to generation.
When I started crocheting this blanket, there was something about it that made me instantly think of an heirloom. With that in mind, I named it The (Modern) Heirloom Baby Blanket.
Sometimes I try to get cute with my pattern names… not today.
While the skills needed for this blanket are a little beyond the stitches you might use for the easiest crochet projects, I’m confident that crocheters with very little experience will be able to make this beautiful blanket. There are written instructions, photos, and a video tutorial to help!
Who knows… It might even become one of your favorite stitch patterns!
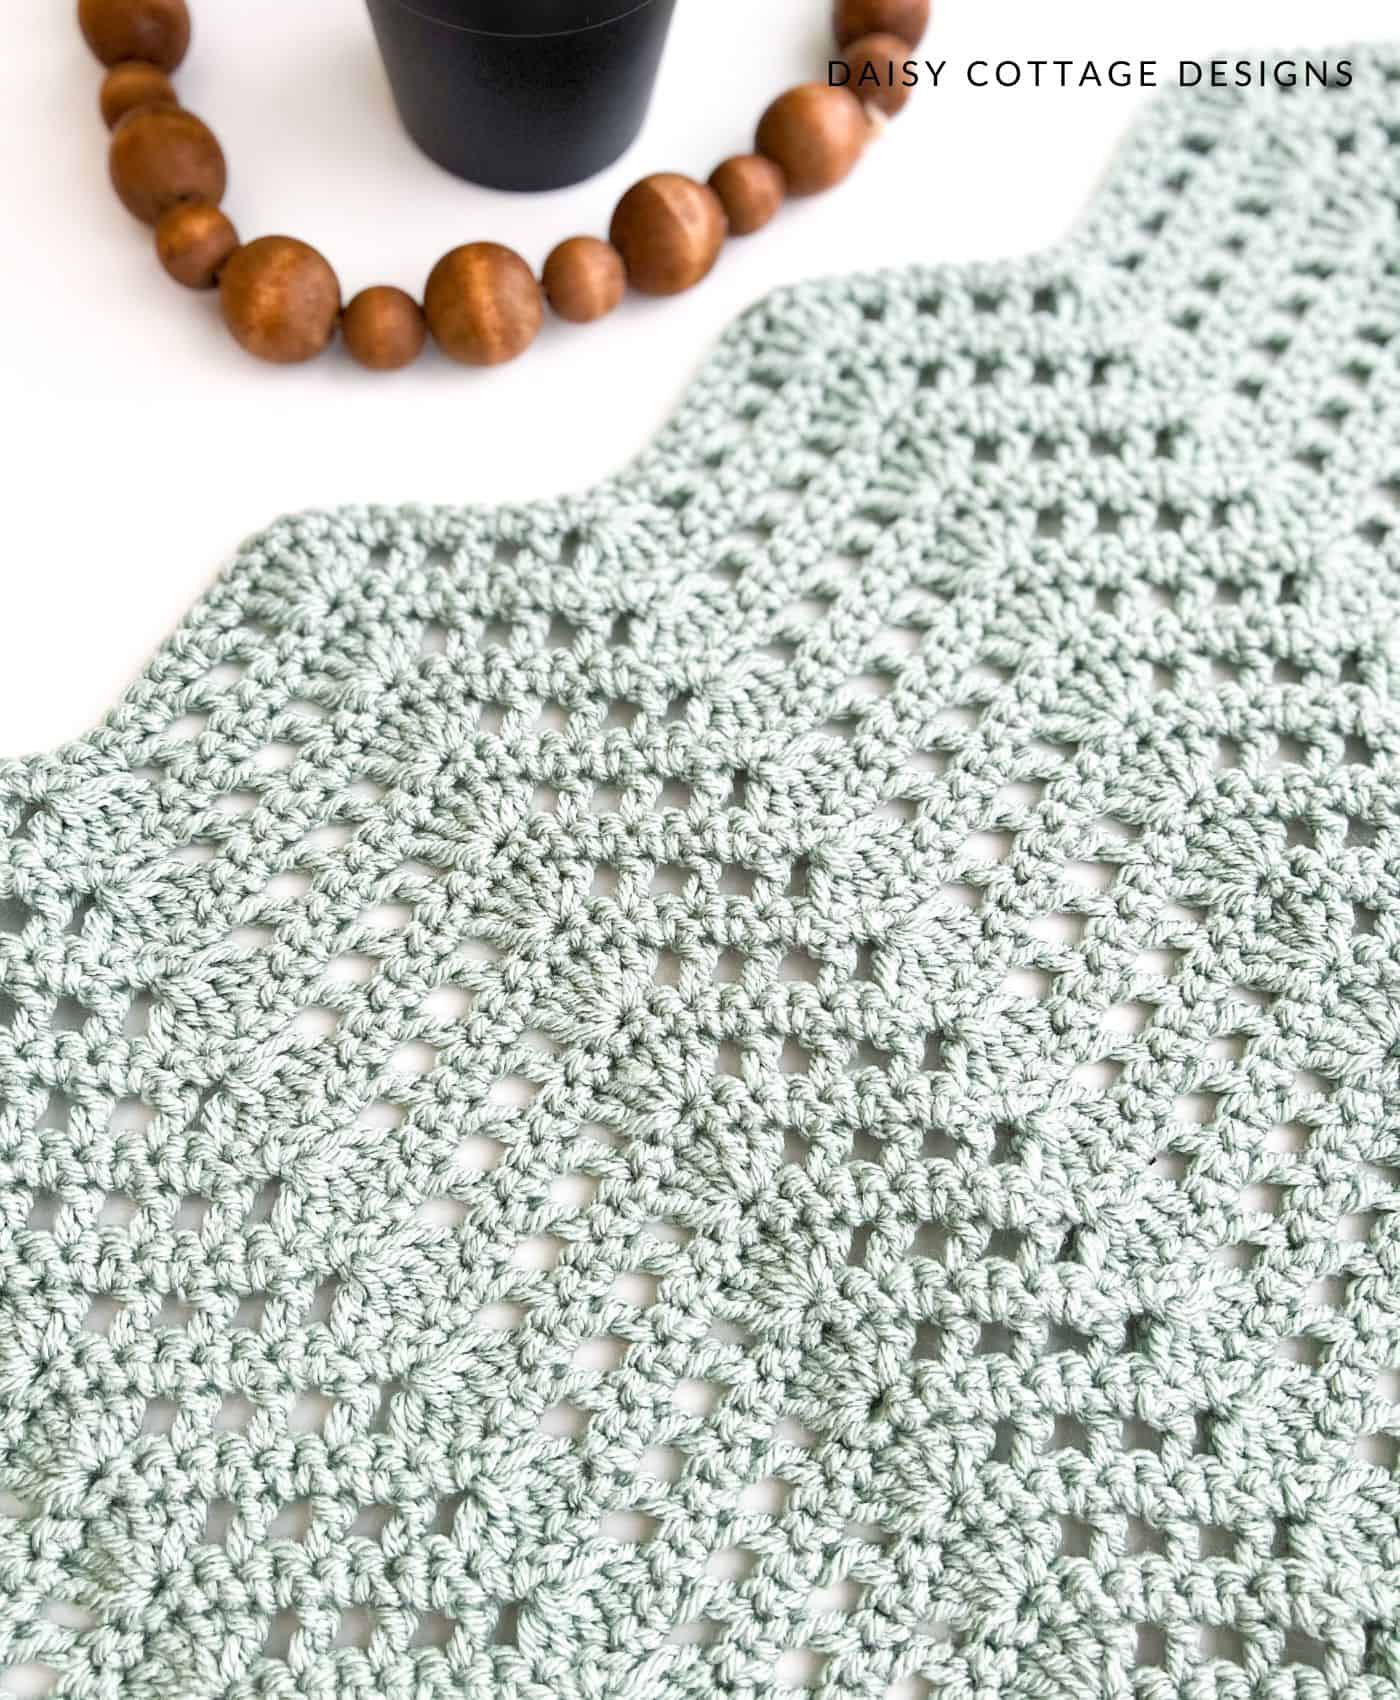
Heirloom Baby Blanket Crochet Pattern
Prefer patterns without ads? The print-friendly PDF is available here.
Materials:
- J/10 (6.00 mm) Crochet Hook – this is my absolute FAVORITE!
- I used just over 2 skeins of Hobby Lobby I Love This Yarn! in the shade Spa.
- If you want to make this blanket using a different yarn, you’ll need approximately 800 yds of worsted weight yarn (chart below gives amounts for 6 different sizes)
- Tapestry needle and scissors.
Pattern Notes:
- Please read through the whole pattern before beginning your project.
- As shown in the photos, finished blanket measures approximately 30×34 inches. Instructions for changing the size are given below the pattern.
- Turning chains do not count as a stitch.
- Pattern is worked through both loops.
- A video tutorial is available here. A second video answering further questions is available here.
Special Stitches (explained in the video):
- dc3tog: yarn over, insert hook into the stitch and pull up a loop. Yarn over and pull through two loops on the hook (should have 2 loops on hook). Yarn over, insert hook into the next stitch and pull up a loop. Yarn over and pull through two loops (should have 3 loops on hook). Yarn over and insert hook into the next stitch and pull up a loop. Yarn over and pull through two loops. There should be 4 loops on your hook. Yarn over and pull through all 4 loops.
- dc5tog: yarn over, insert hook into the stitch and pull up a loop. Yarn over and pull through two loops on the hook (should have 2 loops on hook). Yarn over, insert hook into the next stitch and pull up a loop. Yarn over and pull through two loops (should have 3 loops on hook). Yarn over and insert hook into the next stitch and pull up a loop. Yarn over and pull through two loops (should have 4 loops on hook). Yarn over and insert hook into the next stitch and pull up a loop. Yarn over and pull through two loops (should have 5 loops on hook). Yarn over and insert hook into the next stitch and pull up a loop. Yarn over and pull through two loops. There should be 6 loops on your hook. Yarn over and pull through all 6 loops.
Abbreviations:
- sc – single crochet
- dc – double crochet
- ch – chain
- dc3tog/dc5tog – double crochet 3 together, double crochet 5 together
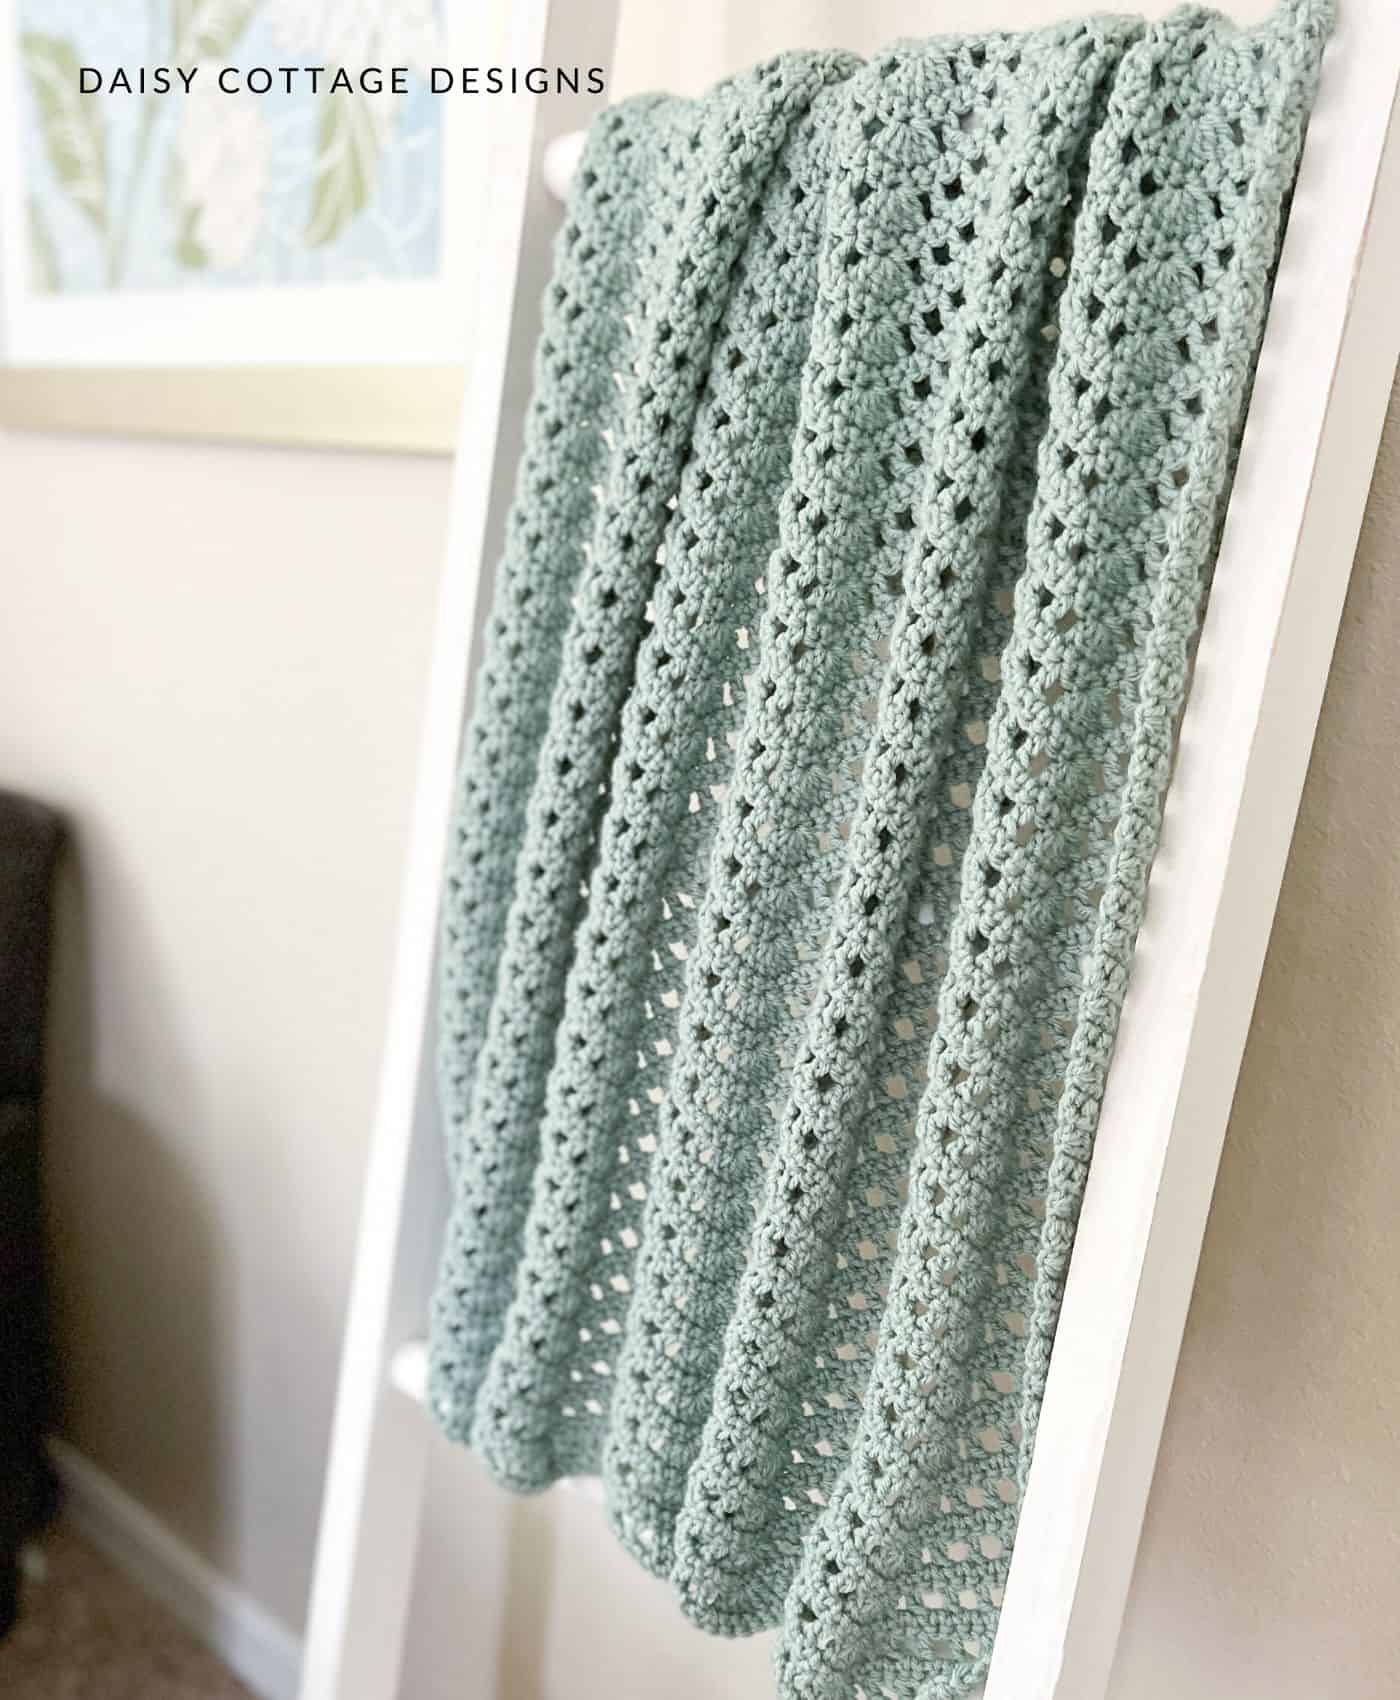
Instructions for making the Heirloom Blanket
Chain 122 (or a number from the chart below)
Row 1: single crochet in the second chain and in each chain across (121 stitches – one fewer than your starting chain). Ch 2, turn.
Row 2: dc3tog over the first 3 stitches (don’t skip the first stitch). *(ch 1, skip a stitch, dc) three times. Ch 1, skip a st, work 5 dc in the next stitch. (Ch 1, skip a stitch, dc) three times. Ch 1, skip a stitch, dc5tog over the next 5 stitches* to the end of the row. On the last repeat, you’ll end with a ch 1, skip a stitch, dc3tog over the last 3 stitches. Ch 1, turn.
Step-by-step instructions for Row 2 are provided below if you find you’re losing your place as you go.
Row 3: single crochet in each stitch and ch 1 space across. (121 stitches). Ch 2, turn.
If you’re struggling with the single crochet round, please see the note below.
Repeat rows 2 and 3 for a total of 73 rows (see chart for number of rows for other sizes). Cut yarn and weave ends.
If you’re having trouble between rows 3 and 4, watch this video.
Step-by-Step Instructions for Row Two:
- Step 1: dc3tog over the first 3 stitches (don’t skip the first stitch)
- Step 2: *ch 1, skip a st, dc* three times.
- Step 3: Ch 1, skip a st, work 5 dc in the next stitch.
- Step 4: *ch 1, skip a st, dc* three times.
- Step 5: Ch 1, skip a stitch, dc5tog over the next 5 stitches.
- Step 6: Repeat steps 2-5 until 4 stitches remain. On the last repeat, end with ch 1, skip a stitch, dc3tog over the last 3 stitches. Ch 1, turn.
Note on Single Crochet Rows:
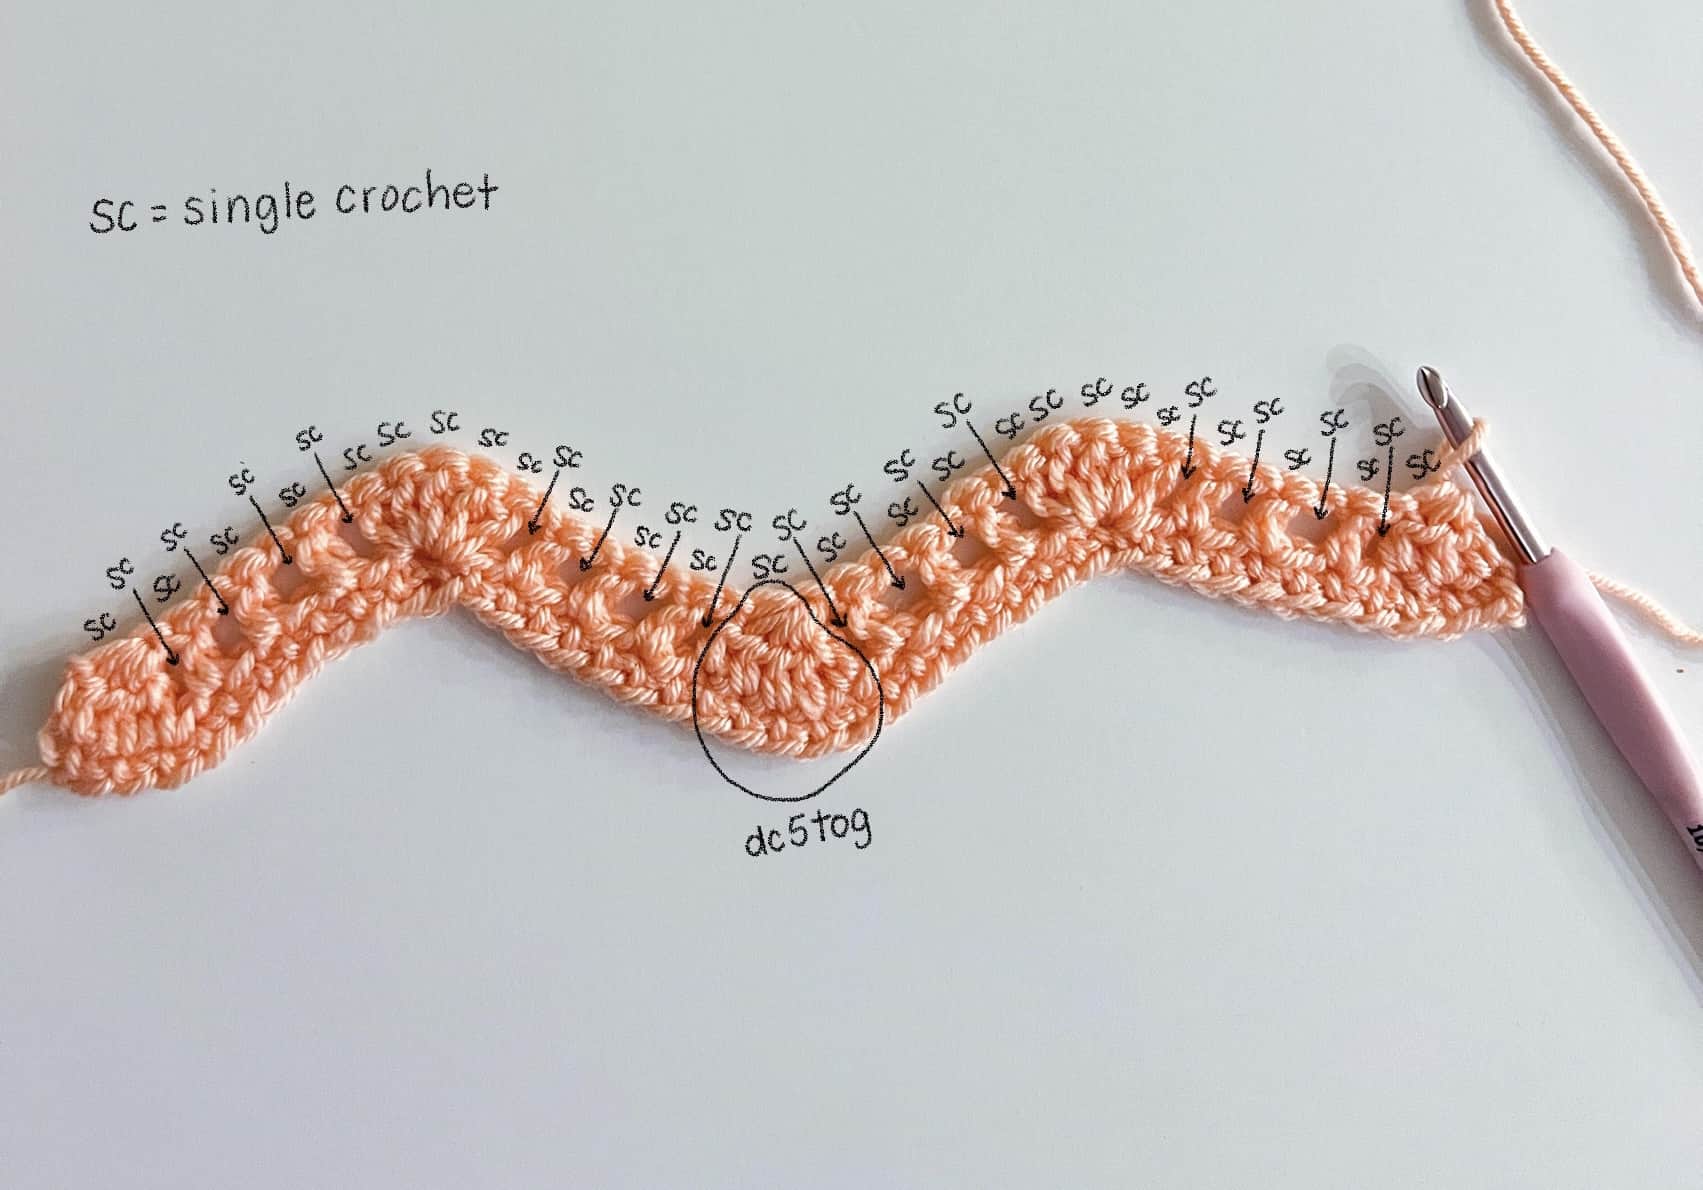
Near the dc5tog, it can be a little bit tricky to see where to insert your hook. You need to make a single crochet in the ch 1 space and in the top of the dc5tog. Do not put a stitch into the ch 1 (shown in the box).
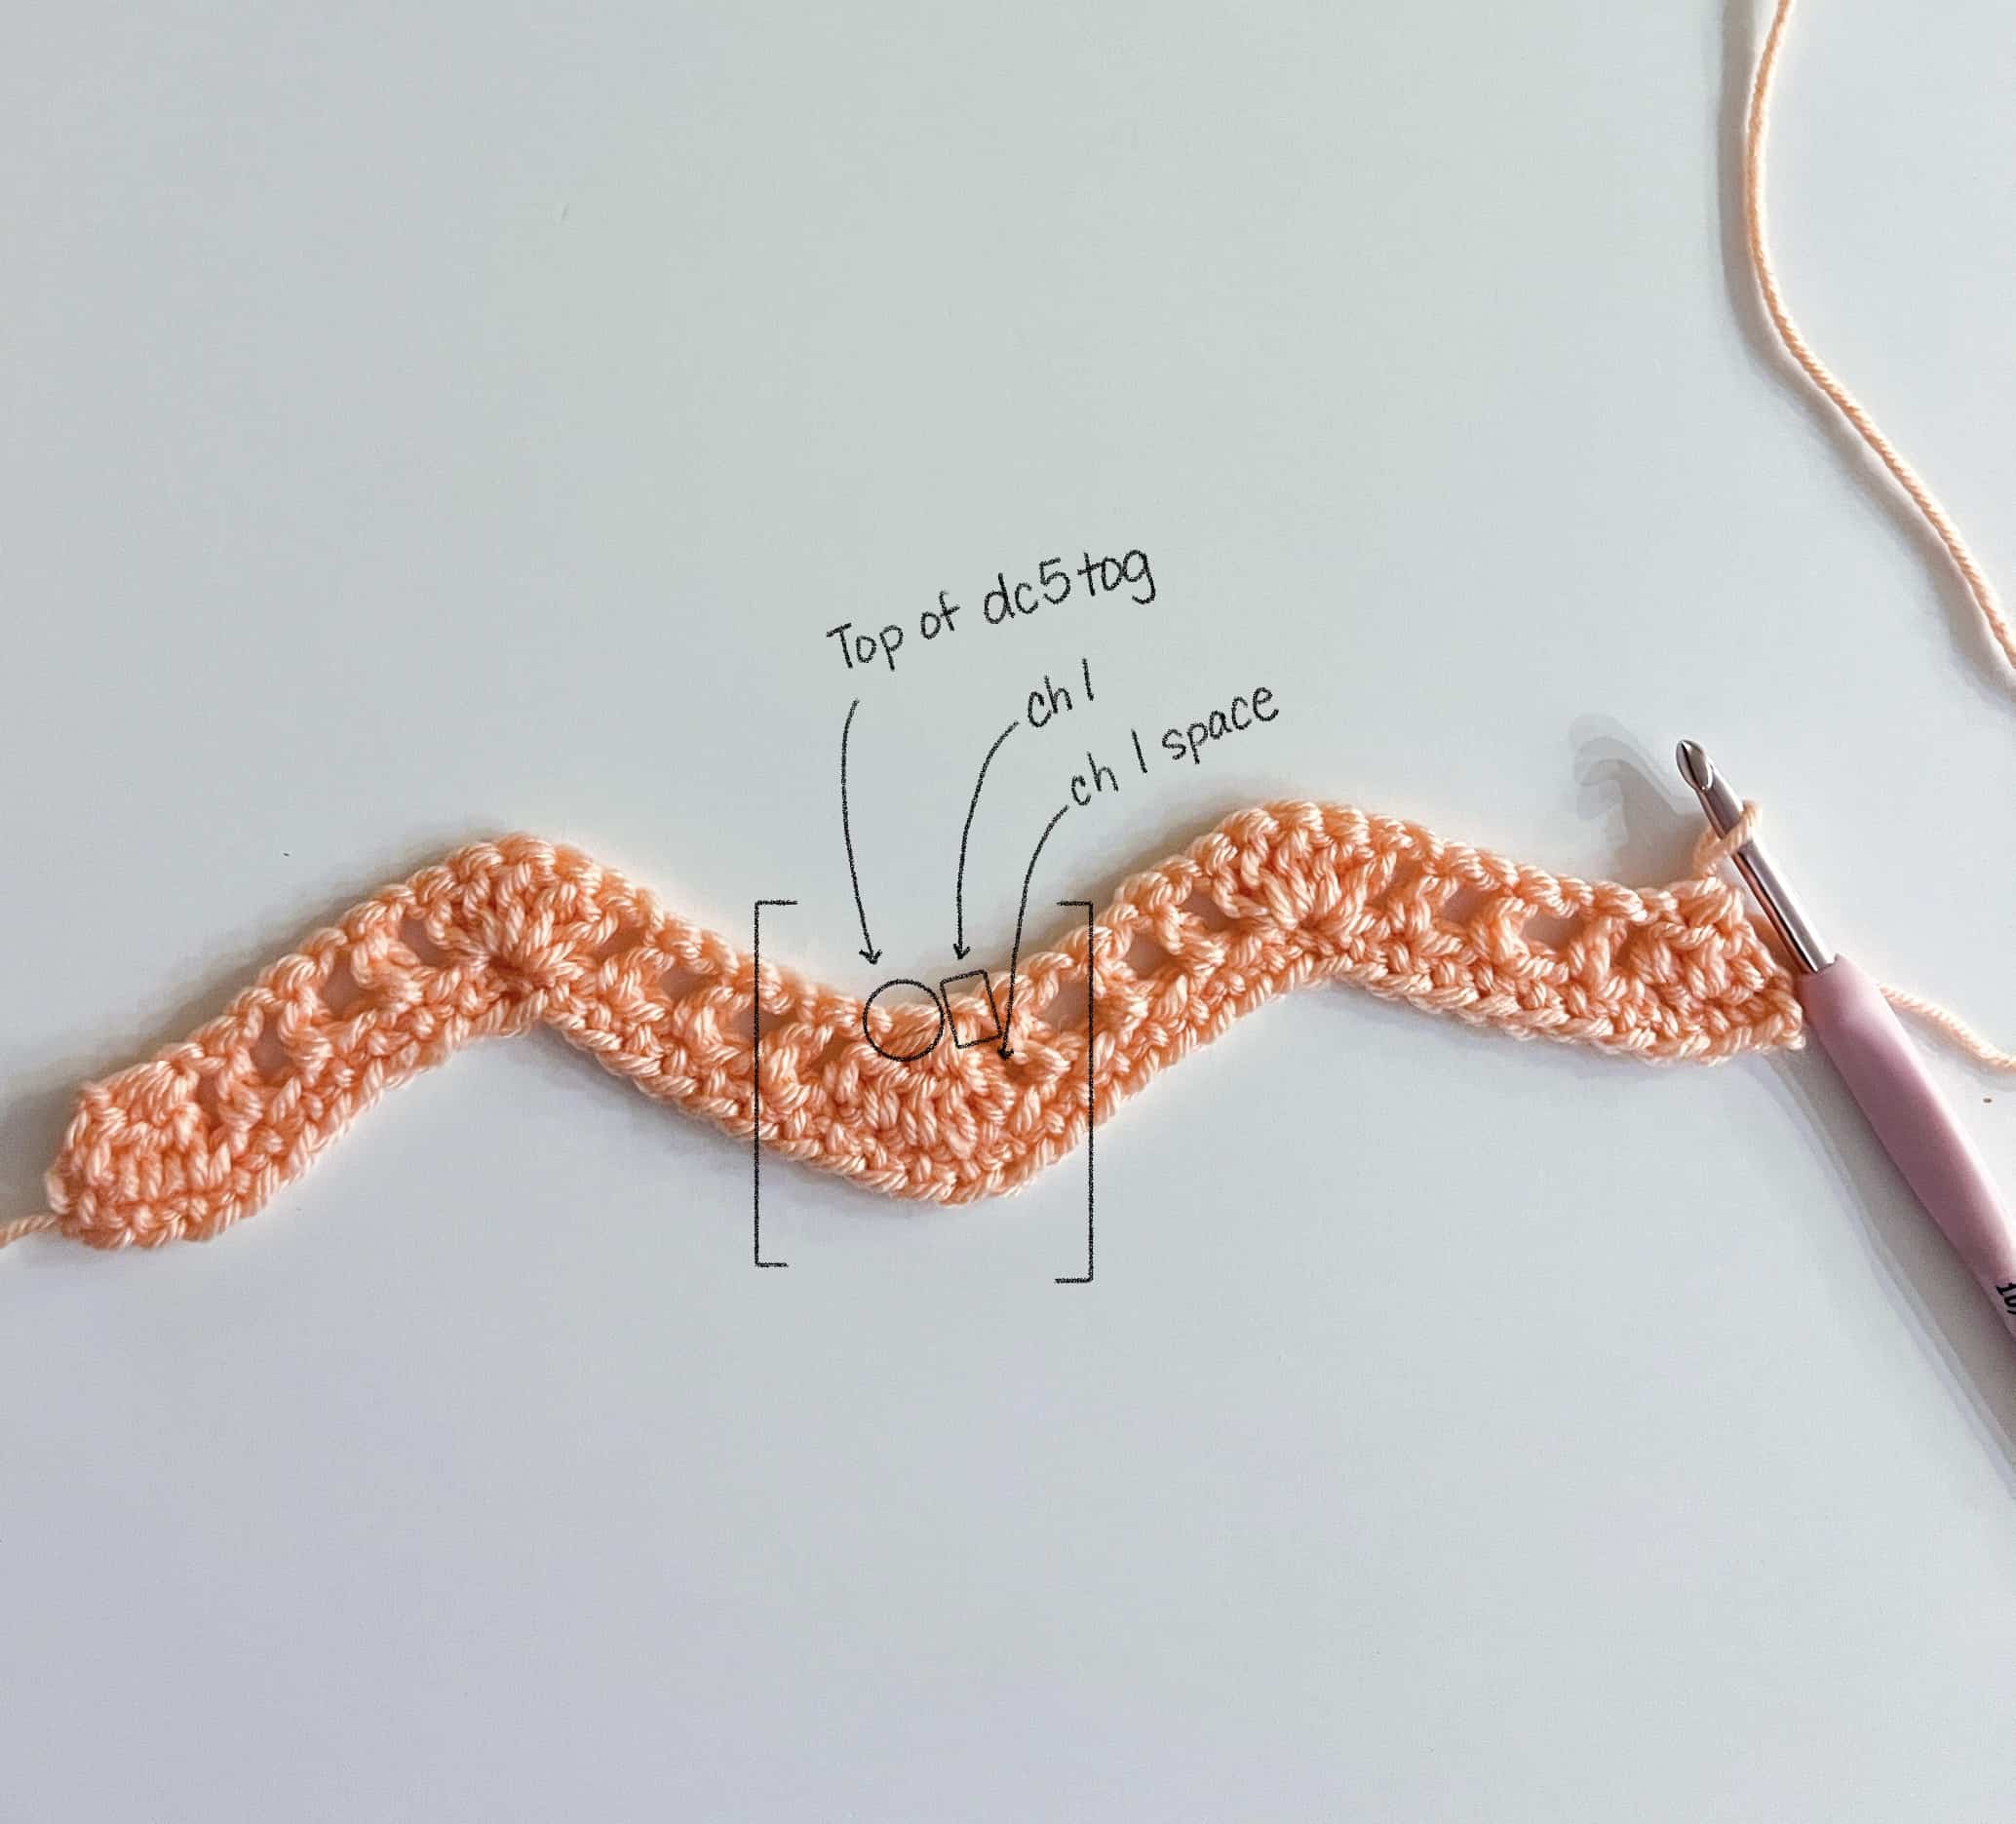
The second photo shows where to put the single crochet stitches. Arrows are pointing to ch 1 spaces.
Adjusting the Size:
Would you like to make a larger version of this modern heirloom baby afghan? Here are the instructions for how to make this blanket in different sizes.
- The multiple for this pattern is 20+2. So, you’ll need to chain a multiple of 20 and then add 2 to get your final chain length.
- Each set of 20 stitches is approximately 5 inches wide
- Adding 20 stitches will add one additional peak to your blanket
- Examples:
- (4×20)+2=82
- (6×20)+2=122
- (10×20)+2=202
- Note: on your single crochet rows, you’ll have one single crochet fewer than chains you start with. For instance, if you start with a chain of 202, you’ll have 201 single crochet stitches.
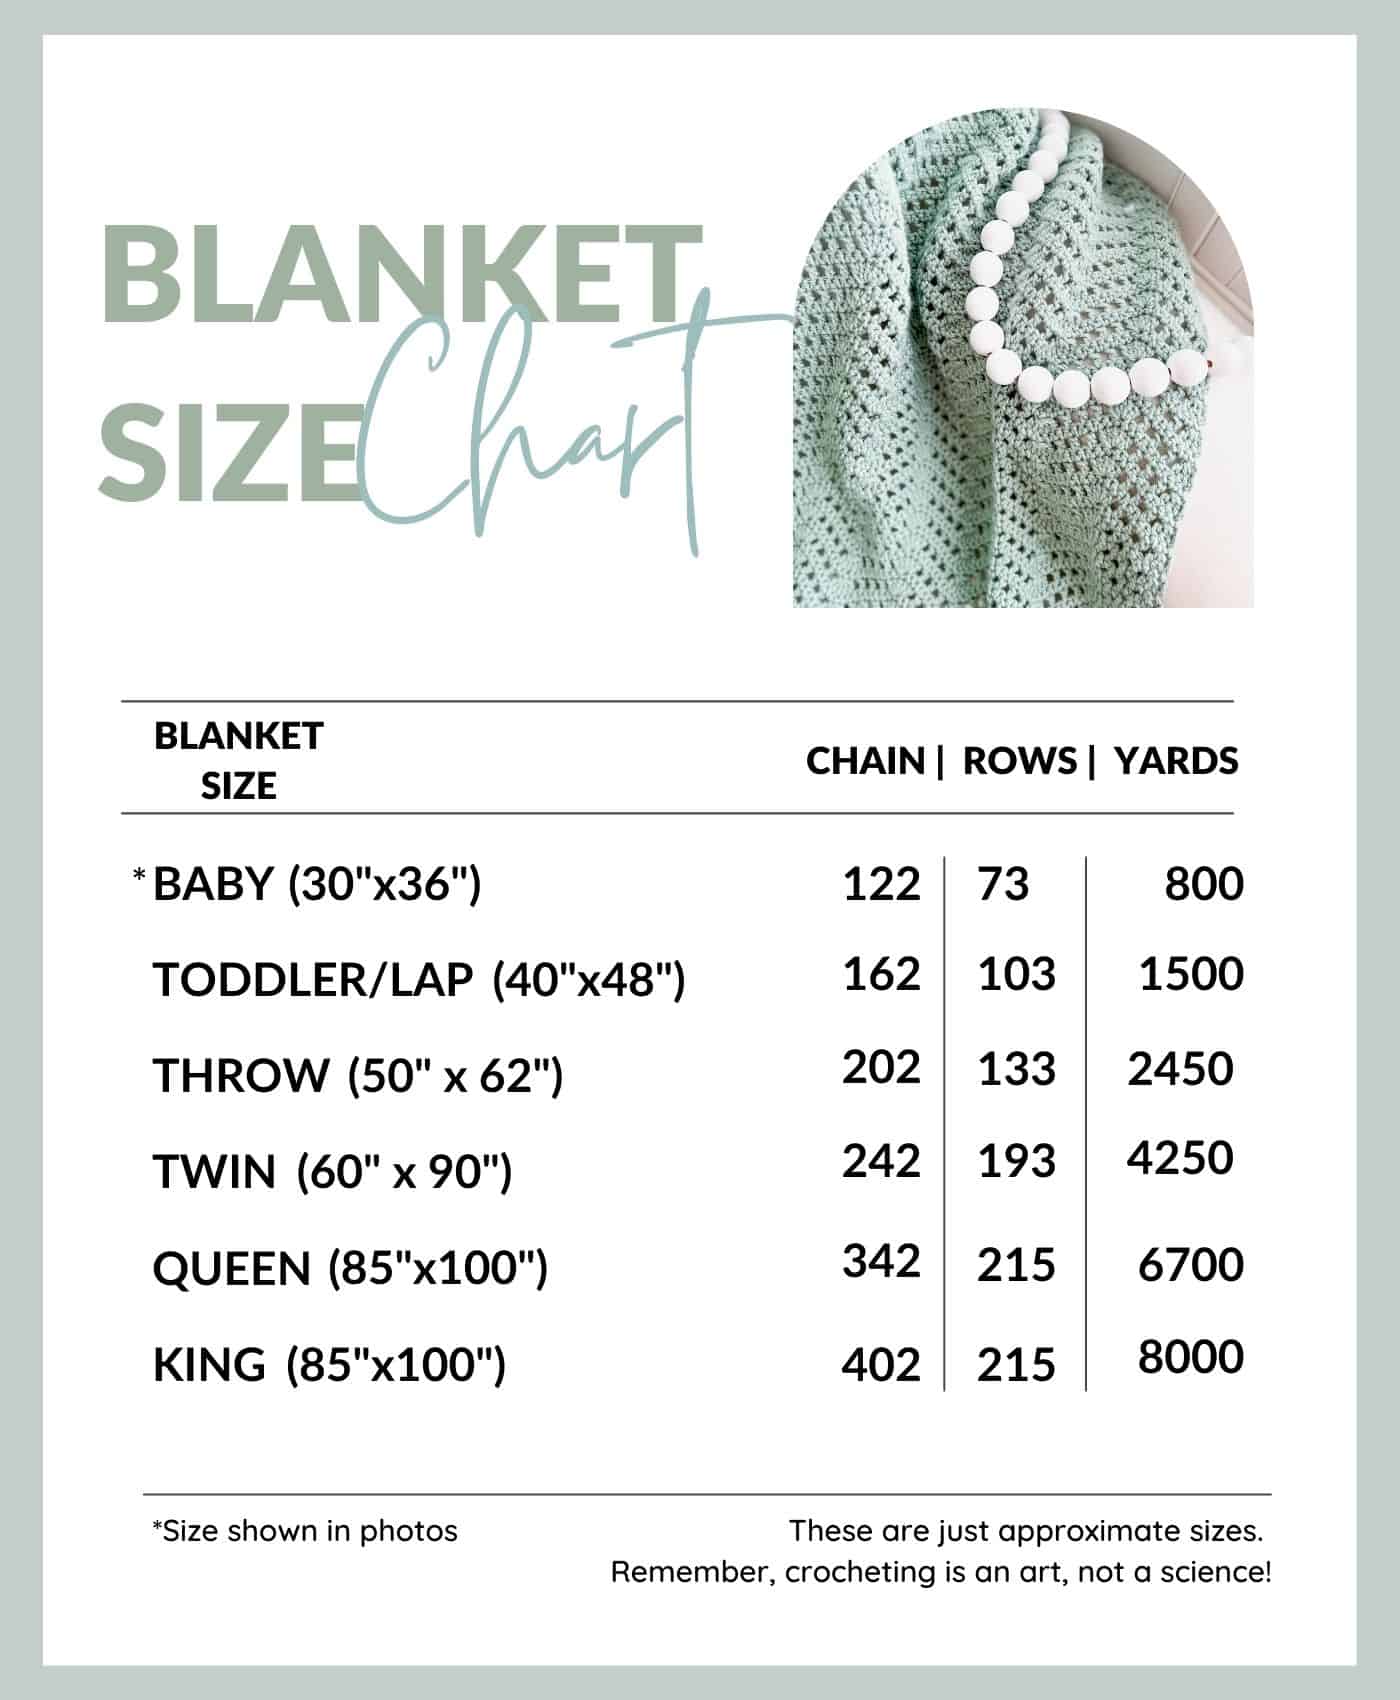
This chart gives the stitch counts and yardage for various sizes.
Get creative and make this blanket as big or small as you want to. If you have questions about adjusting the size, feel free to send me a message.
Other Crochet Patterns You Might Like
After you’ve finished this blanket and you need something else to make, check out these free crochet patterns.
- Classic Ripple Baby Blanket – you can never go wrong with this classic pattern!
- Cobblestone Pathways Throw Blanket – uses a beautiful moss stitch
- Easy Baby Blanket Crochet Pattern – if you feel like making the most relaxing project ever.
Share your work!
I hope you enjoy making this blanket as much as I did. While you’re crocheting and when you’re done, I’d love it if you’d share photos of your work on Instagram or Facebook so I can see the Heirloom Blanket you make. Use #daisycottagedesigns so I can see your beautiful creations.
It makes my day to see my patterns in use.
Feel free to sell items that you make using Daisy Cottage Designs patterns. Please just be sure to use your own photos in Etsy listings, etc.

I love this !!
But, I’d like to make it bigger. How would I do that ?
Thank you.
Miss Rocky
There’s a whole section under the pattern that will explain how to adjust the size! 🙂
Step by step instructions for row 2
Step 6 at the end what is hn6b?
I was wondering the same thing.
I just updated the pattern 🙂
I don’t know how that happened. Should read “Repeat steps 2-5 until 4 stitches remain. On the last repeat, end with ch 1, skip a stitch, dc3tog over the last 3 stitches. Ch 1, turn.” I have no idea how the hn6b got there 😅
It’s all fixed now.
Hi my name is Debra and I am so excited to do this blanket, I might do the King size, thank you so much.
Debra
I hope you love it!
Absolutely stunning can’t wait to make this.
Love the look of this blanket, how do you add a boarder (I’m still learning, self taught myself in lock down)
This blanket is borderless. 🙂
Hi Lauren, how do you stop it fr9m curling along the edge without a border? Thank you!
I don’t understand what I am doing wrong. I made my foundation row, then the first row, then the row of single crochets. I counted to make sure there were 121 stitches. I have that. Then when I went to start my row of Dc3together,, they don’t line up. Can you help?
I am having that same problem. HELP us PLEASE!
I’m having the same problem! HELP!!!!!
Hi, Pamela. Have you watched the videos?
You can find the first one here: https://www.youtube.com/watch?v=dE_9W_FgC30
The second one is available here: https://www.youtube.com/watch?v=_1sLF4blIKo
These videos should walk you through all the steps. If you’re still having issues, feel free to send me an email and I’ll try to offer personalized assistance!
Lauren
Hi, Jacqueline. Somehow I’m not getting emails when people make comments on my blog anymore, so I totally missed your question. I apologize about that. I have changed some settings now, so hopefully I’ll see each comment as they come in.
I made a second video that should answer all your questions: https://www.youtube.com/watch?v=_1sLF4blIKo
Happy Crocheting,
Lauren
In the Baby Blanket Heirloom Crochet Pattern, in the Ste-by-Step Instruction, Step 6 indicates …
Step 6: Repeat steps 2-5 to the end of the row. On the last repeat, hn6b
What does hn6b mean? I have searched and searched and been unable to determine what this means. Kindly explain.
Ugh! I have no idea what happened. I’ve updated the pattern… Step 6 should read: Repeat steps 2-5 until 4 stitches remain. On the last repeat, end with ch 1, skip a stitch, dc3tog over the last 3 stitches. Ch 1, turn.
Lauren — What is the name of the blanket below at the right at the bottom of the page, please? It’s the very last one on the page. I’ve gone through the patterns but don’t seem to be able to find it. As far as the Heirloom Baby Blanket is concerned, it’s on my list of things to do! Thanks so much for the detailed instructions, You invest so much time into these patterns and I for one, truly appreciate it. The pictures and videos are excellent and “double helpful”. Thanks again for the truly great patterns you provide.
Do you think this pattern would work with the bernat baby velvet yarn, which is worsted weight?
Hi, Kathy. I think Bernat Velvet might look better with a less open stitch. But, making a swatch is always the best way to go!
Happy Crocheting,
Lauren
I have done the first 3 rows 40 different times and keep ending with 5 stitches when I get to the end, not 4. What am I doing wrong🤷♀️
Hi, Michelle. It’s hard to tell without seeing a photo of your work – you’re welcome to shoot me an email with a photo and I’ll help you figure it out. There are two videos on YouTube that should help troubleshoot issues that you might be having.
You can find the first one here: https://www.youtube.com/watch?v=dE_9W_FgC30
The second one is available here: https://www.youtube.com/watch?v=_1sLF4blIKo
Happy Crocheting,
Lauren
I would like to make this pattern using a lighter yarn and smaller hook.
It this possible?
Pretty blanket!
Help please! I bought the Heirloom pattern yesterday. Almost sorry I did.
I can do rows 1 and 2 ans 3, after that i am totally lost.
I feel as if there is a row missing in the directions.
It is not coming out right.
Hi, Ginger. Did you watch the videos that go along with the pattern? I think the issue is that people expect every stitch to line up, but they don’t. I made a second video after some people were having issues. It’s linked in the original video, and I send to to whoever emails me about it.
Somehow, I’ve stopped receiving emails from people who leave comments on the blog, so I didn’t see the comments until today. I’ve gone in and changed the settings so hopefully I’ll be seeing messages as they come in now.
Here’s the video that shows how to go from row 3 to row 4: https://www.youtube.com/watch?v=_1sLF4blIKo.
Happy Crocheting,
Lauren
This is a very beautiful pattern and heirloom blanket is the perfect name.
You are right, if you study the tutorial video carefully, it is very basic stitches, no different than doing a basic ripple blanket and counting your stitches in the beginning to keep in pattern.
Thank you for a lovely pattern,i can’t wait to begin it, I’m heading out to local hobby lobby to buy all the yarn needed in many different colors, these will xmas gifts for our cold winters.
you explain all very well and it is very easy to follow each step .😊
This new pattern is beautiful. Thank you for the sizing directions for a twin blanket. I enjoy your website very much and look forward to your new ideas and inspiration. Enjoy the season!
Hi there! If you’re struggling going from Row 3 to Row 4, I created a second video that should help you!
Here are links to both videos that go along with this pattern:
You can find the first one here: https://www.youtube.com/watch?v=dE_9W_FgC30
The second one is available here: https://www.youtube.com/watch?v=_1sLF4blIKo
Happy Crocheting,
Lauren
Dear Lauren,
I have thoroughly enjoyed your crochet patterns, emails, and website…you are very talented! I cannot wait to start the Heirloom Baby Blanket. I crochet baby blankets for the local church to hand out as a baby welcoming gift, and this pattern will be the envy of all the mothers. Thanks for sharing your talent!
This pattern is absolutely beautiful and I am excited to begin it for a dear friend. The videos are immensely helpful, thank you for taking the time to further explain the pattern. I’m sure the sweet family will love this blanket for their new bundle of joy!
I hope you love it, Nikki! Send me an email if you have any issues!
Happy Crocheting,
Lauren
Thank you so much for the Heirloom blanket pattern. It’s beautiful. Also,A Big Thanks for all the other patterns you share.
Love this blanket, I’m making it at present and finding it easy, haven’t had any problems with the pattern, can’t wait to get it finished
The step by step instructions are so helpful….this is a gorgeous pattern!