Flower Crochet Blanket Pattern: The Petal Parade Blanket
You’re going to fall in love with this flower crochet blanket pattern! The full pattern is in the post below below, or you can grab the print-friendly PDF on Etsy. Either way, you’ll end up with a stunning blanket that’s sure to be treasured.
I enjoyed making this flower blanket, and I have been so excited to share the pattern with you!
In December, I made this puff stitch crochet blanket, and an idea for a new design came to me as I was working on it. What if I turned the puff stitches into stems and added flowers to finish off the design?
That’s when the idea for Petal Parade Blanket was born.
I loved the first blanket so much that I immediately got to work making a second, smaller version of this flower blanket in different colors.
While I decided to keep all the flowers the same color on each blanket, I fully intend to make another one with multi colored blooms. I’ve even had someone say it would be fun to do a different type of flower on each stem.
I also think it would be beautiful to work the stems in a green print or variegated yarn. The possibilities are so fun to think about!
Believe it or not, much of this blanket is made using double crochet stitches. But, this beautiful crochet flower blanket does use techniques that are a little more challenging than the basic stitches, as well. Even so, I truly believe that this pattern can be mastered by any crocheter.
The toughest part is learning to change colors in the middle of a row. But, after you get the hang of it, it truly becomes an easy pattern! It’s a great way to learn some new skills and level up your crocheting.
If you’ve never changed colors mid-row, I recommend watching the video tutorial before you give this blanket a try.
The flowers are not crocheted as part of the body of the blanket. They’re made separately and sewn on. I tried two different methods for attaching the flowers, and found the instructions in this video most helpful.
Sewing flowers onto both sides of the blanket makes it reversible, but you could just sew flowers on the “front” of the blanket if you prefer. Or let’s be honest… if you just really want to finish your project. 🙂
Each flower measures approximately 4.5 inches in diameter – the perfect size for the top of the stems!
The Petal Parade Blanket Pattern
Prefer a printable pattern? The ad-free pdf is available here.
Materials
- J/10 (6.00 mm) Crochet Hook
- For the Baby Blanket Size:
- Approximately 725 yards of worsted weight yarn for the body of the blanket. I used the following shades:
- 575 yards (2 skeins) of Hobby Lobby I Love This Yarn in the shade Ivory.
- 150 yards (1 skein) of Yarn BeeSoft and Sleek in the shade Sage
- Approximately 450 yards of worsted weight yarn for the flowers. I used:
- Hobby Lobby I Love This Yarn in the shade Glacier (2 skeins)
- Note: if you want flowers on just one side of the blanket, you’ll only need 225 yards of yarn.
- Approximately 725 yards of worsted weight yarn for the body of the blanket. I used the following shades:
- For the Lapghan/Toddler Size:
- Approximately 1650 yards of worsted weight yarn for the body of the blanket. I used the following shades.
- 1300 (4 skeins) of Premier Basix in the shade Crepe
- 350 (1 skein) of Premier Basix in the shade Sage
- Approximately 1650 yards of worsted weight yarn for the body of the blanket. I used the following shades.
- Approximately 700 yards of worsted weight yarn for the flowers. I used:
- Premier Basix in the shade Light Mauve (2 skeins)
- Note: if you want flowers on just one side of the blanket, you’ll only need 350 yards.
- Stitch marker (could use a safety pin, bobby pin, or a piece of yarn)
- Tapestry needle and scissors for weaving ends.
- A print-friendly PDF is available here.
Pattern Notes
- This blanket measures approximately 40” x 44” (Lapghan/Toddler) or 27″ x 29″ (Baby Size)
- The turning chain does not count as a stitch in this project.
- If you crochet tightly, go up a hook size.
- Gauge is not important for this project.
- There is a video tutorial for the body of the blanket. You can find it here.
- The flower pattern is available here. You can find the video tutorial for the flowers here.
- Always remember that you can click the gear icon on a YouTube video to adjust the playback speed if you want the video to be faster or slower!
Abbreviations
- ch – chain
- sc – single crochet
- hdc – half double crochet
- dc – double crochet
- sl st – slip stitch
- Puff – puff stitch
- ** – Repeat what is written between the stars
Special Stitch
Puff Stitch (puff):
- Step 1: Yarn over, insert hook into st and pull up a loop. (3 loops on hook)
- Step 2: Yarn over, insert hook into same st and pull up a loop (5 loops on hook)
- Step 3: Repeat step 2 twice (9 loops on hook).
- Step 4: yarn over and pull through the first 8 loops on hook (skip the last loop).
- Step 5: yarn over, pull through remaining 2 loops.
- Video tutorial available here.
Color Change Notes
- Video tutorial available here.
- Reading through this portion may seem confusing if you’ve never changed colors in the middle of a row before. I encourage you to start by watching the video! It will make everything so much clearer.
- To change color on a double crochet stitch: yarn over, insert hook into the stitch and pull up a loop. Yarn over, pull through 2 loops. Yarn over with new color, and pull the new color through the last 2 loops.
- To change colors on a puff stitch: follow steps 1-4 above. For step 5, yarn over with new color, and pull the new color through the last 2 loops.
- Lay the yarn you’re not working with behind your work and crochet right over that yarn so you can pick it up again at the next color change.
Lapghan/Toddler Size Instructions:
Using the lighter color, Chain 115.
Row 1: sc in the second st and in each st across. Ch 1, turn.
You should have 114 sc at the end of Row 1.
Note: Place a stitch marker on the right hand side of this row before turning.
Row 2: dc in the first 10 stitches. On the tenth stitch, pull through the last two loops with Fern to complete the stitch. *skip the next st, (puff, ch 1, puff) in the next. On the second puff stitch, pull through the last two loops with Crepe. Skip the next st. dc in the next 10 stitches* across. Ch 1, turn.
Note: Please see the video tutorial for this project if you need additional help changing colors in the middle of a row.
Row 3: dc in the first 10 stitches. On the tenth stitch, pull through the last two loops with Fern to complete the stitch. *skip the next st, (puff, ch 1, puff) in the ch 1 space. On the second puff stitch, pull through the last two loops with Crepe. Skip the next st. dc in the next 10 stitches* across. Ch 1, turn.
Rows 4-32: Repeat row 3.
The height of each stem is different, so on Rows 33-55 you will begin gradually omitting puff stitches.
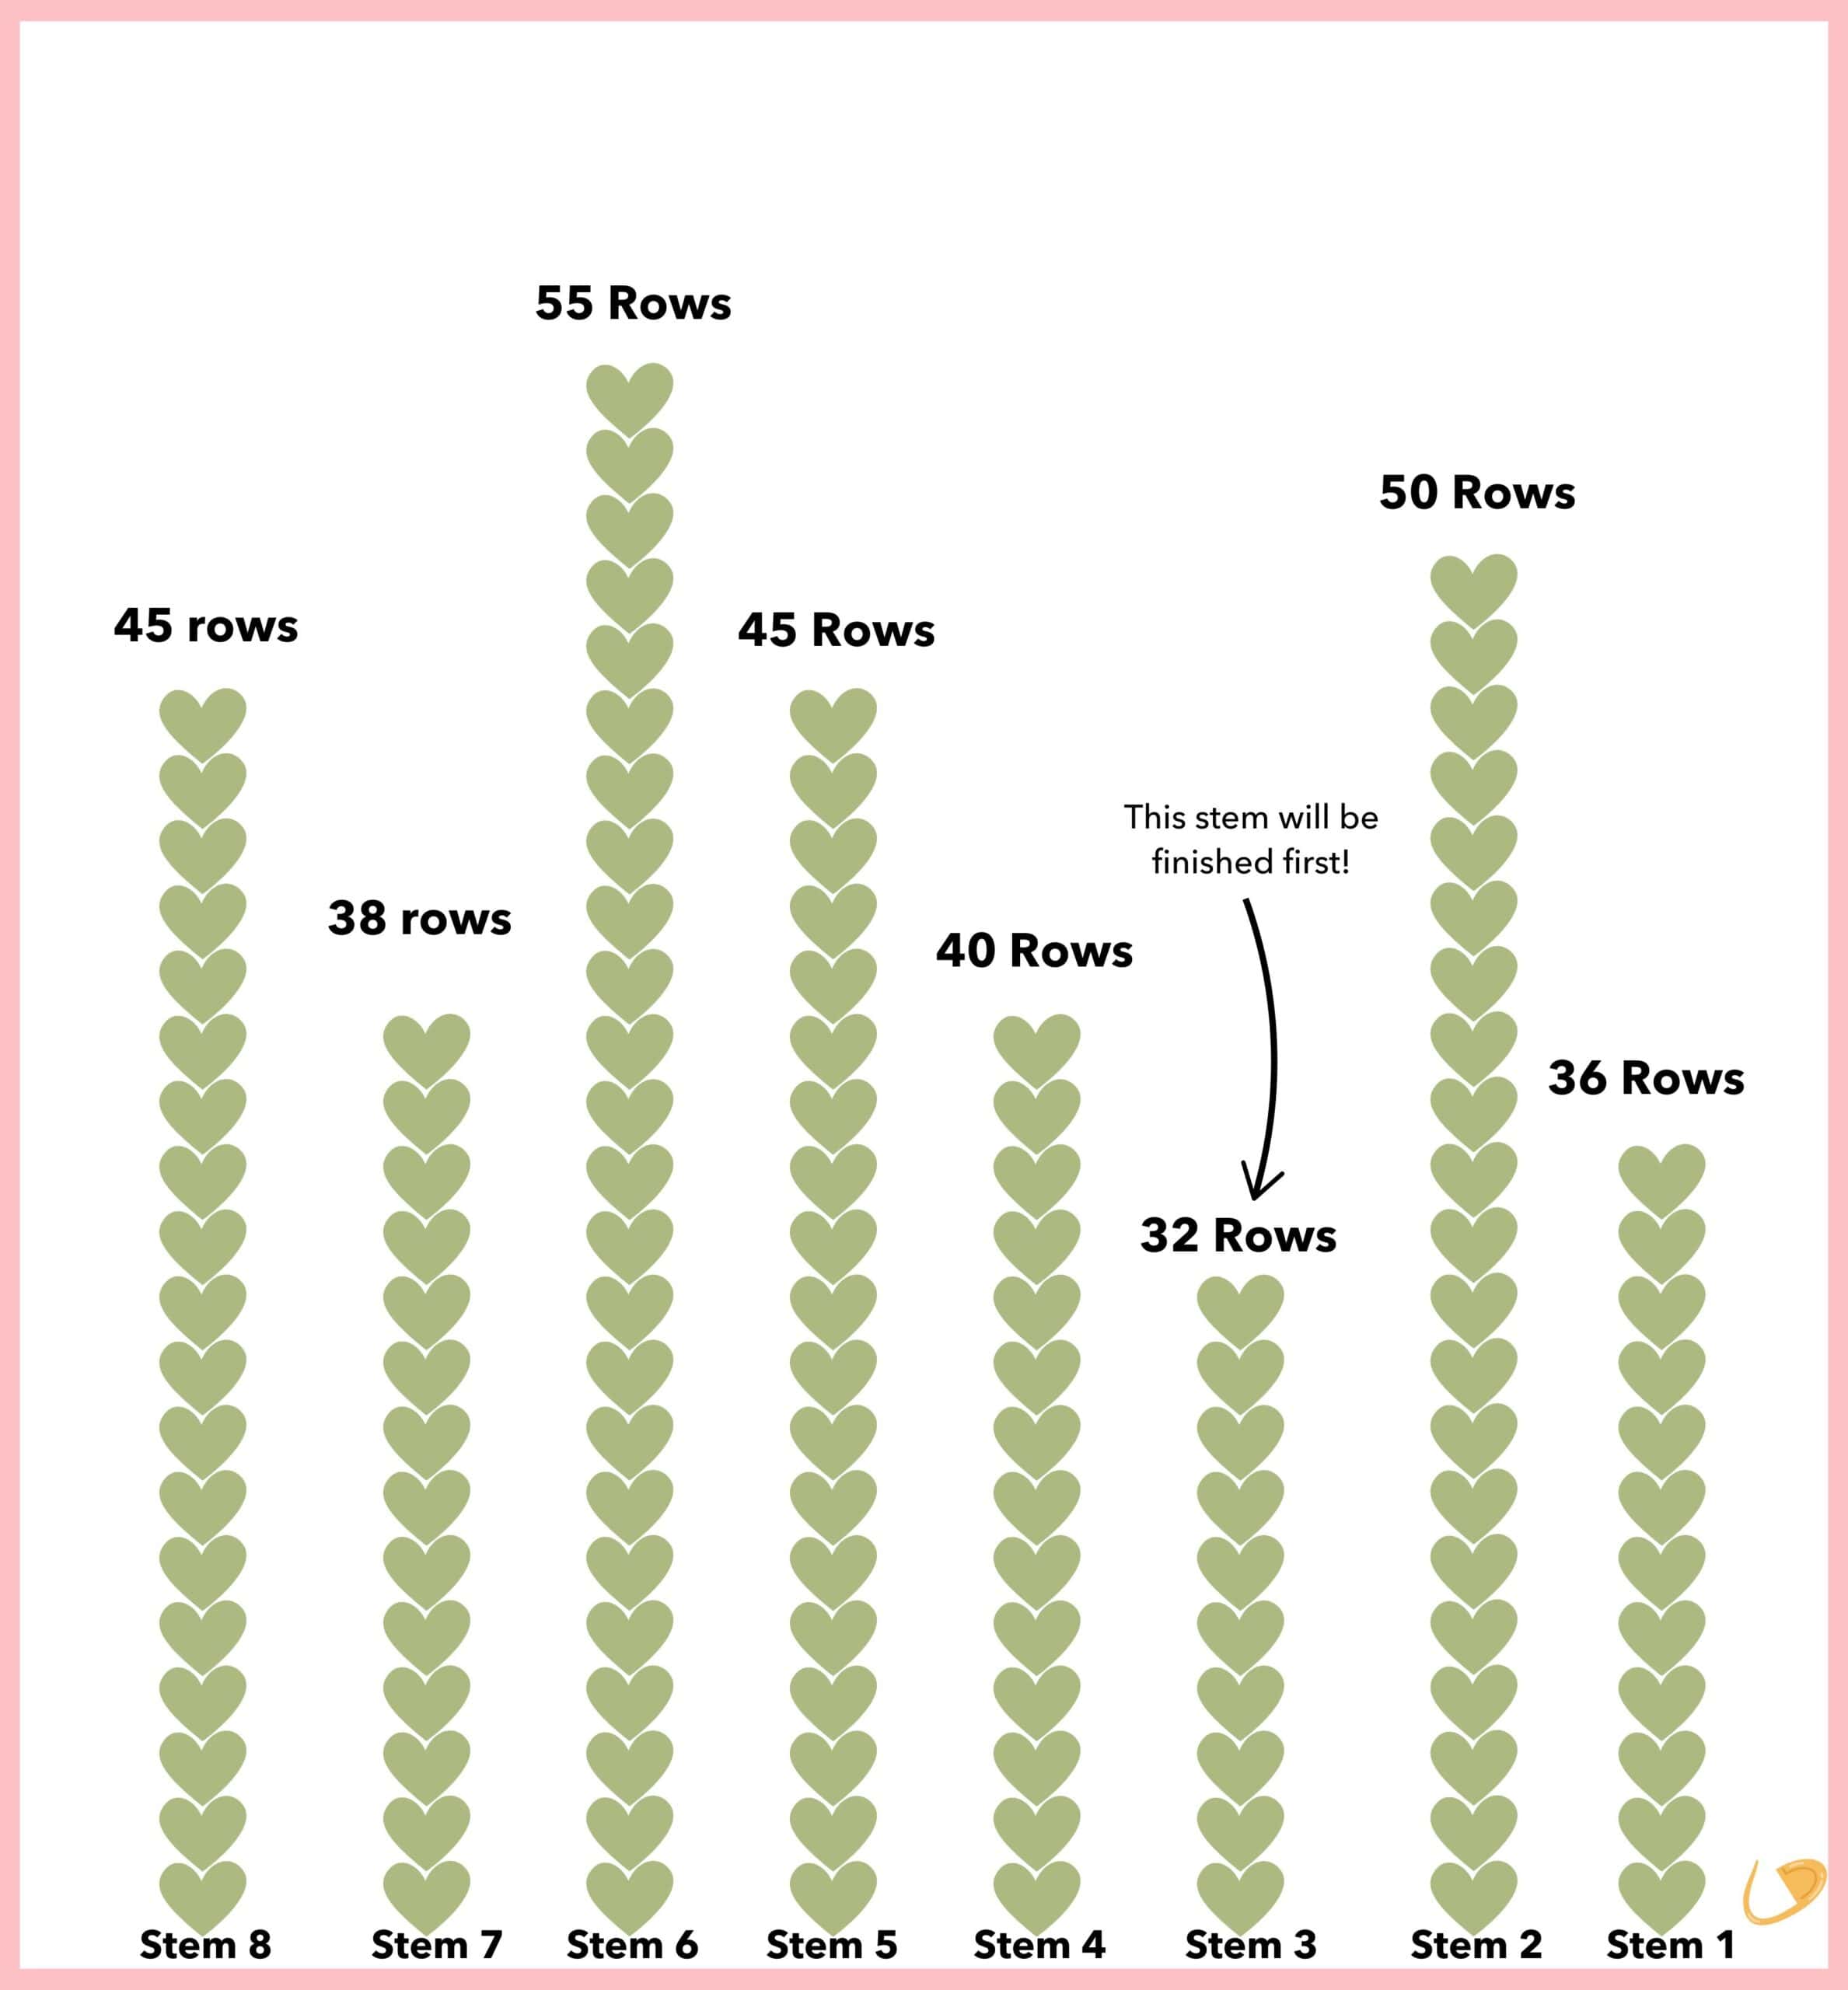
The image above shows you the number of rows for each stem. Be sure to count your rows when the stitch marker is on the right side of your project. Once you’ve completed Row 32 you will no longer add puff stitches to the third stem, and so on!
When it is time to omit a puff stitch, dc in the puff stitch, the ch 1 space, and the puff stitch from the previous row.
Rows 56-73: dc in the first st and in each stitch across. Ch 1, turn.
Baby Blanket Size Instructions
Instructions:
Using Ivory, Chain 76.
Row 1: sc in the second st and in each st across. Ch 1, turn. (75 sc)
Note: Place a stitch marker on the right hand side of this row before turning.
Row 2: dc in the first 10 stitches. On the tenth stitch, pull through the last two loops with Fern to complete the stitch. *skip the next st, (puff, ch 1, puff) in the next. On the second puff stitch, pull through the last two loops with Crepe. Skip the next st. dc in the next 10 stitches* across. Ch 1, turn.
Note: Please see this video if you need additional help changing colors in the middle of a row.
Row 3: dc in the first 10 stitches. On the tenth stitch, pull through the last two loops with Fern to complete the stitch. *skip the next st, (puff, ch 1, puff) in the ch 1 space. On the second puff stitch, pull through the last two loops with Crepe. Skip the next st. dc in the next 10 stitches* across. Ch 1, turn.
Rows 4-18: Repeat row 3.
The height of each stem is different, so on Rows 19-33 you will begin gradually omitting puff stitches.
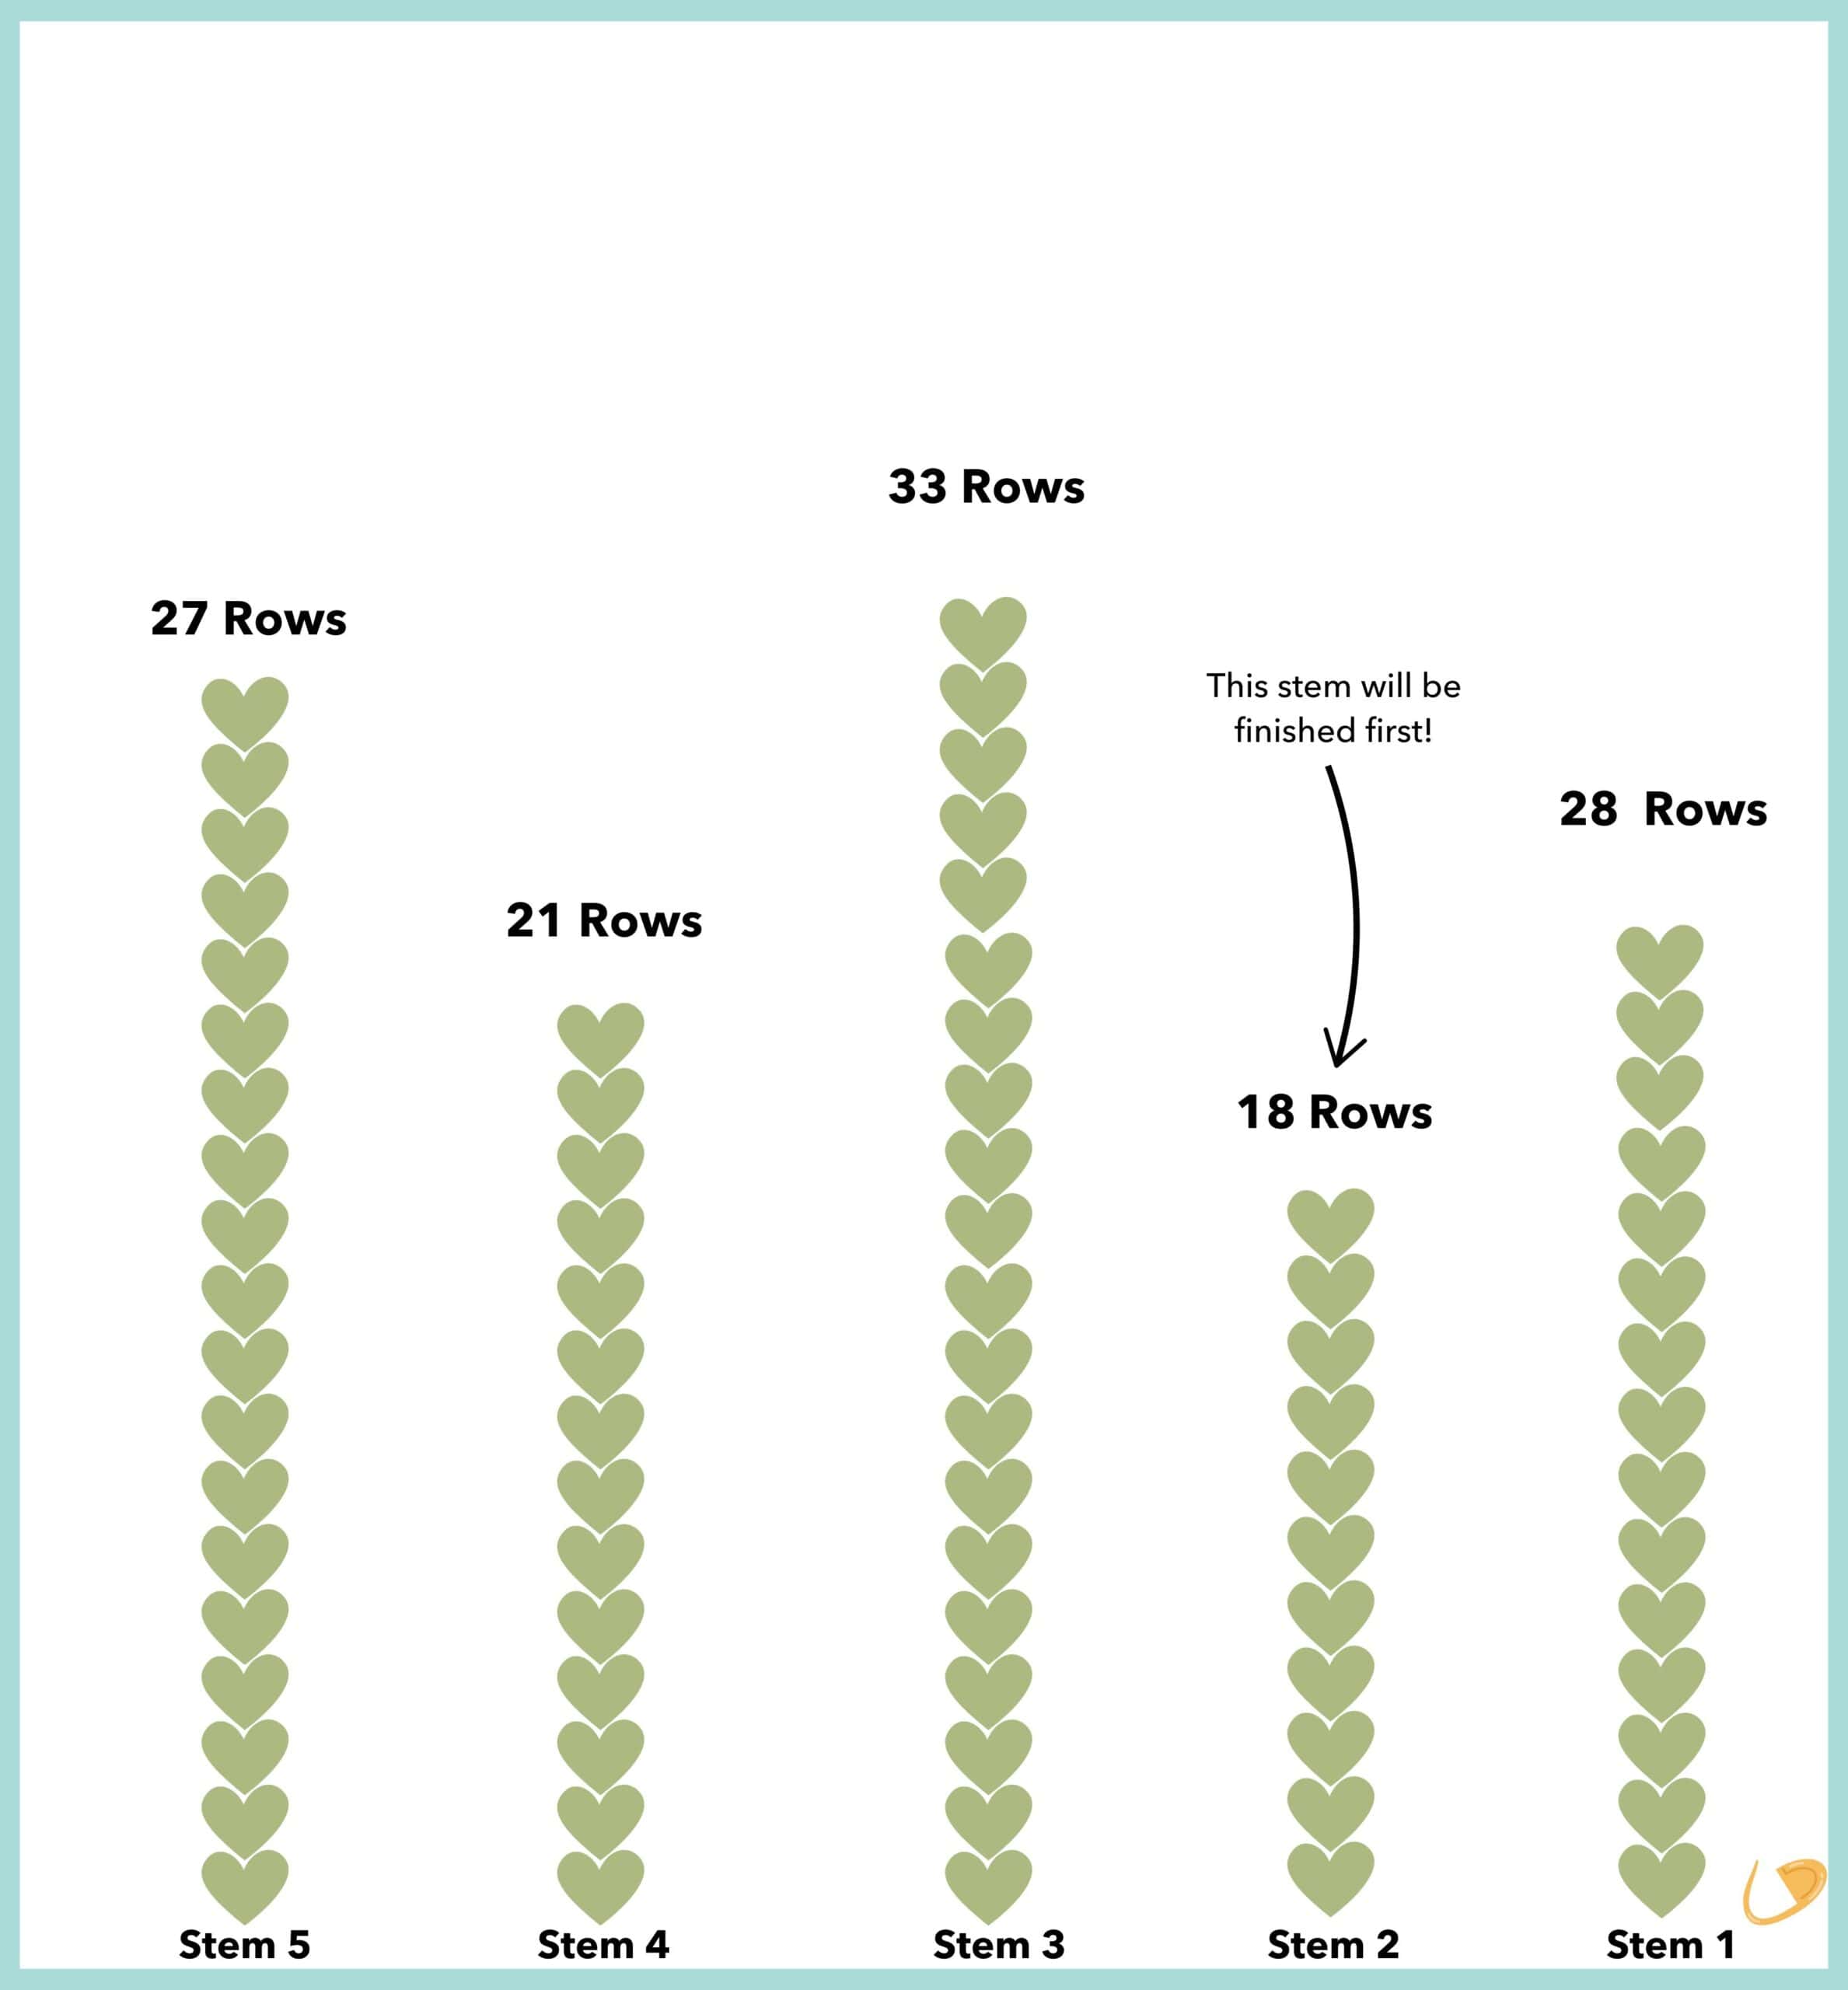
The image above shows you the number of rows for each stem. Be sure to count your rows when the stitch marker is on the right side of your project. Once you’ve completed Row 18, you will no longer add puff stitches to the second stem, and so on!
When it is time to omit a stem, dc in the puff stitch, the ch 1 space, and the puff stitch from the previous row.
Rows 34-49: dc in the first st and in each stitch across. Ch 1, turn.
Border Instructions
Round 1: single crochet evenly around the entire blanket, working 3 sc in each corner. Sl st to the top of the first stitch to join.
Helpful Hint: On the raw edge, work 2 sc into the side of each dc row.
Round 2: Ch 1, hdc evenly around the entire blanket, working (hdc, ch 2, hdc) in each corner. Sl st to the top of the first stitch to join.
Cut yarn and weave ends.
Round 3: Join Light Mauve or Glacier (whichever matches your flowers) with a sl st in any corner and sc evenly around the entire blanket, working (sc, ch 1, sc) in each corner. Sl st to the to pop the first st to join.
Cut yarn and weave ends.
Flower Notes
I used this large flower crochet pattern for the flowers on my blanket. You can find a video tutorial here.
Pleas note, the ad-free PDF includes the full flower tutorial. Google doesn’t like duplicate content, so I am unable to include the full flower pattern within this post.
For the Lapghan/Toddler Blanket size, you’ll need 16 flowers if you want to make this blanket reversible. If you just want flowers on one side, only 8 flowers will be needed.
For the Baby Blanket size, you’ll need 10 flowers if you want to make this blanket reversible. If you just want flowers on one side, only 5 flowers will be needed.
Share Your Work
I’d love it if you’d share your stunning crochet flower blanket with me after you finish! I love seeing my patterns “in action,” so please tag me on Facebook or Instagram (@daisycottagedesigns).
Big thanks to you! 🙌
I would like to make this in a queen size. What would be your recommendation for adapting the pattern.
Thank you.
You’d want your starting chain to be in the mid 200s, I’d think. I’m honestly not sure that the scale would look right at the size, though… I think the stems and flowers would seem pretty tiny on a queen size variation 🙂
Could I just crochet additional rounds on the flower to make it bigger? So it would look better on a queen size bed? That should be easy to adjust. I never make baby size blankets. Even if it is a gift for a baby, I make it much, much bigger to be put on the floor for tummy time or playing. That way the child gets more use out of it. It can be used to cover a crib size toddler bed, etc.
You could! I’d add 1-2 chains to the chain spaces and 2-3 dc to each subsequent petal round 🙂
This may be my favorite of all your beautiful patterns! Thanks for sharing!
Aw. Thanks, Shannon! I love it, too. It was a labor of love.
This blanket is beautiful! Thank you for the pattern. 🙂 Logistically speaking, is there a reason to carry the green yarn vs. using a new ball/bobbin of green yarn for every stem? I can always see the carried yarn in my work.
Nope! Bobbins would totally work. 🙂
Hi Lauren
I’m having a hard time with the puff stitches. Each time that I gently tug on the green yarn to neaten things up, the left “leaf” of the puff stitch pulls to the left. And I’m being very gentle.
I could send a photo if that would help.
I have no issue with the colour change and my flowers are all done. But the puff stitches look very uneven and messy. Right now I’m just practicing over and over. Any suggestions would be so appreciated.
Hi, Candice! Definitely send me. a photo, and I’ll see if I can help. Lauren@daisycottagedesigns.net