Puff Stitch Crochet Blanket – The Happy Hearts Blanket Pattern
Looking for a beautiful puff stitch blanket to crochet? This project works up quickly and is a stunning project for crocheters of any skill level. Find the full pattern below – including 10 sizes – or purchase the ad-free PDF here.

This new puff stitch blanket was a fun one to make. While I have used the bobble stitch in the past (on this blanket and this hat), I haven’t done much with crochet puff stitches.
The full pattern is included at the bottom of this blog post, but you can also purchase the ad-free PDF here if you prefer printing a clean copy. If you’re not ready to crochet this pattern right now, pin it for later!
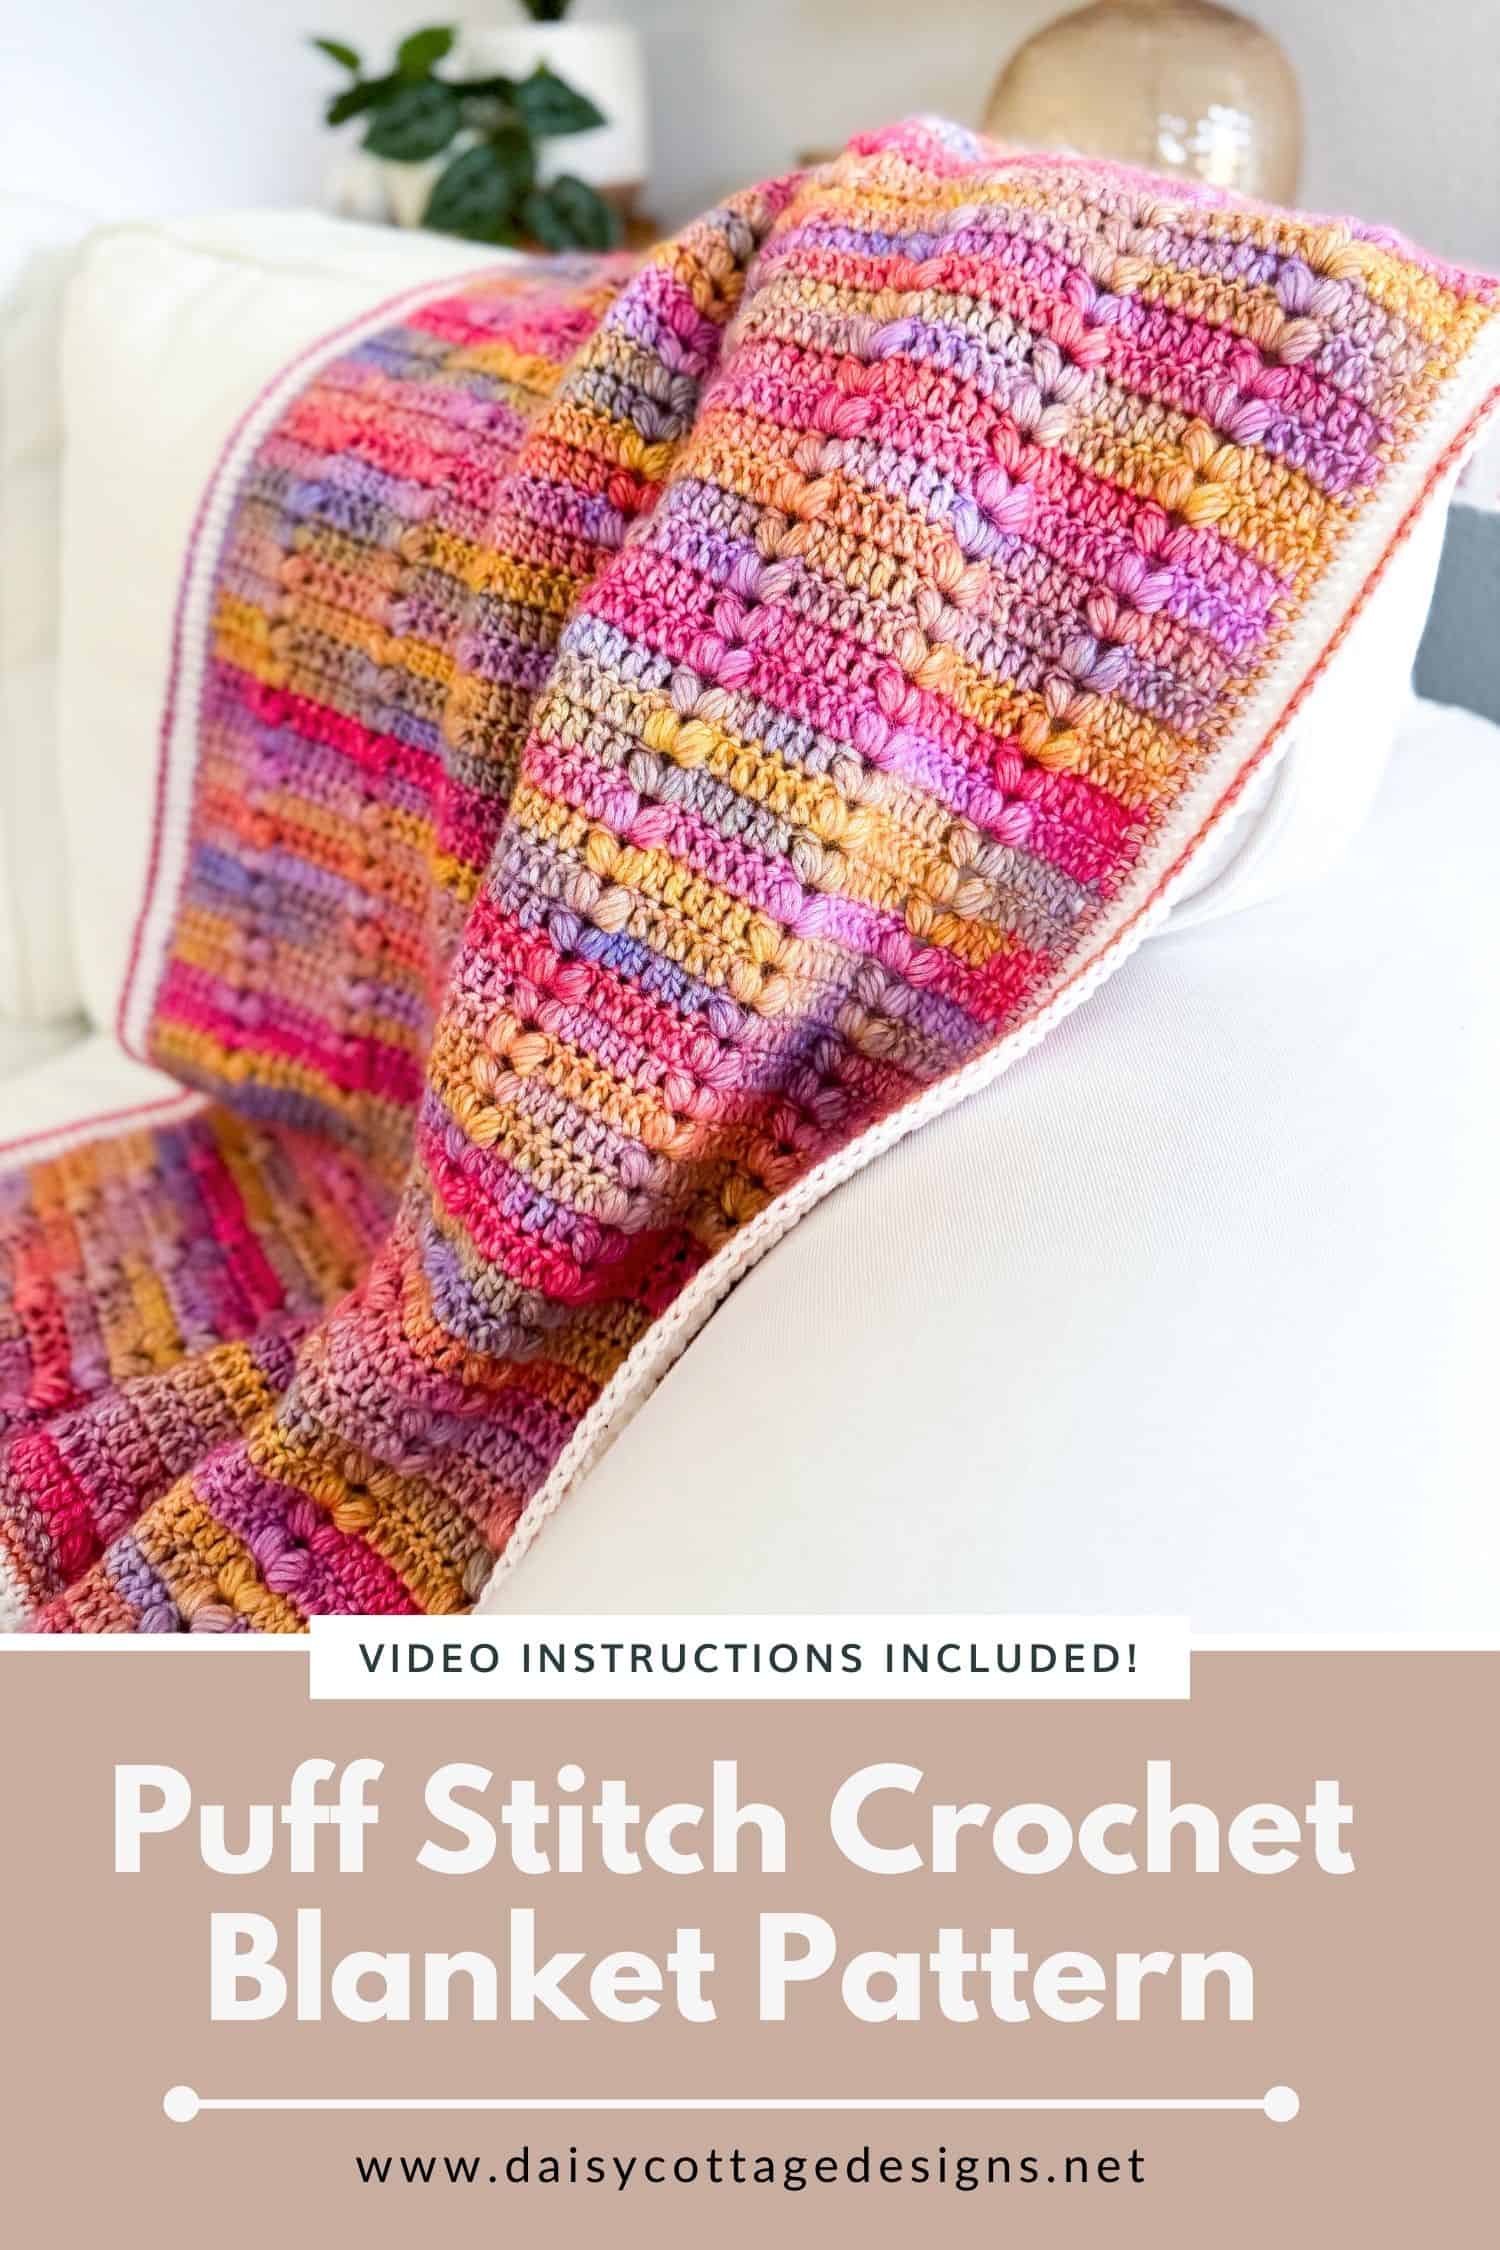
I loved this stitch pattern. Sprinkling puffs between simple double crochet stitches let me achieve exactly the look I was going for. As. I was working, I couldn’t decide if the puff stitches looked more like hearts or leaves climbing up the blanket. I love that the puff stitches look the same on either side of the blanket – yay for no wrong side!

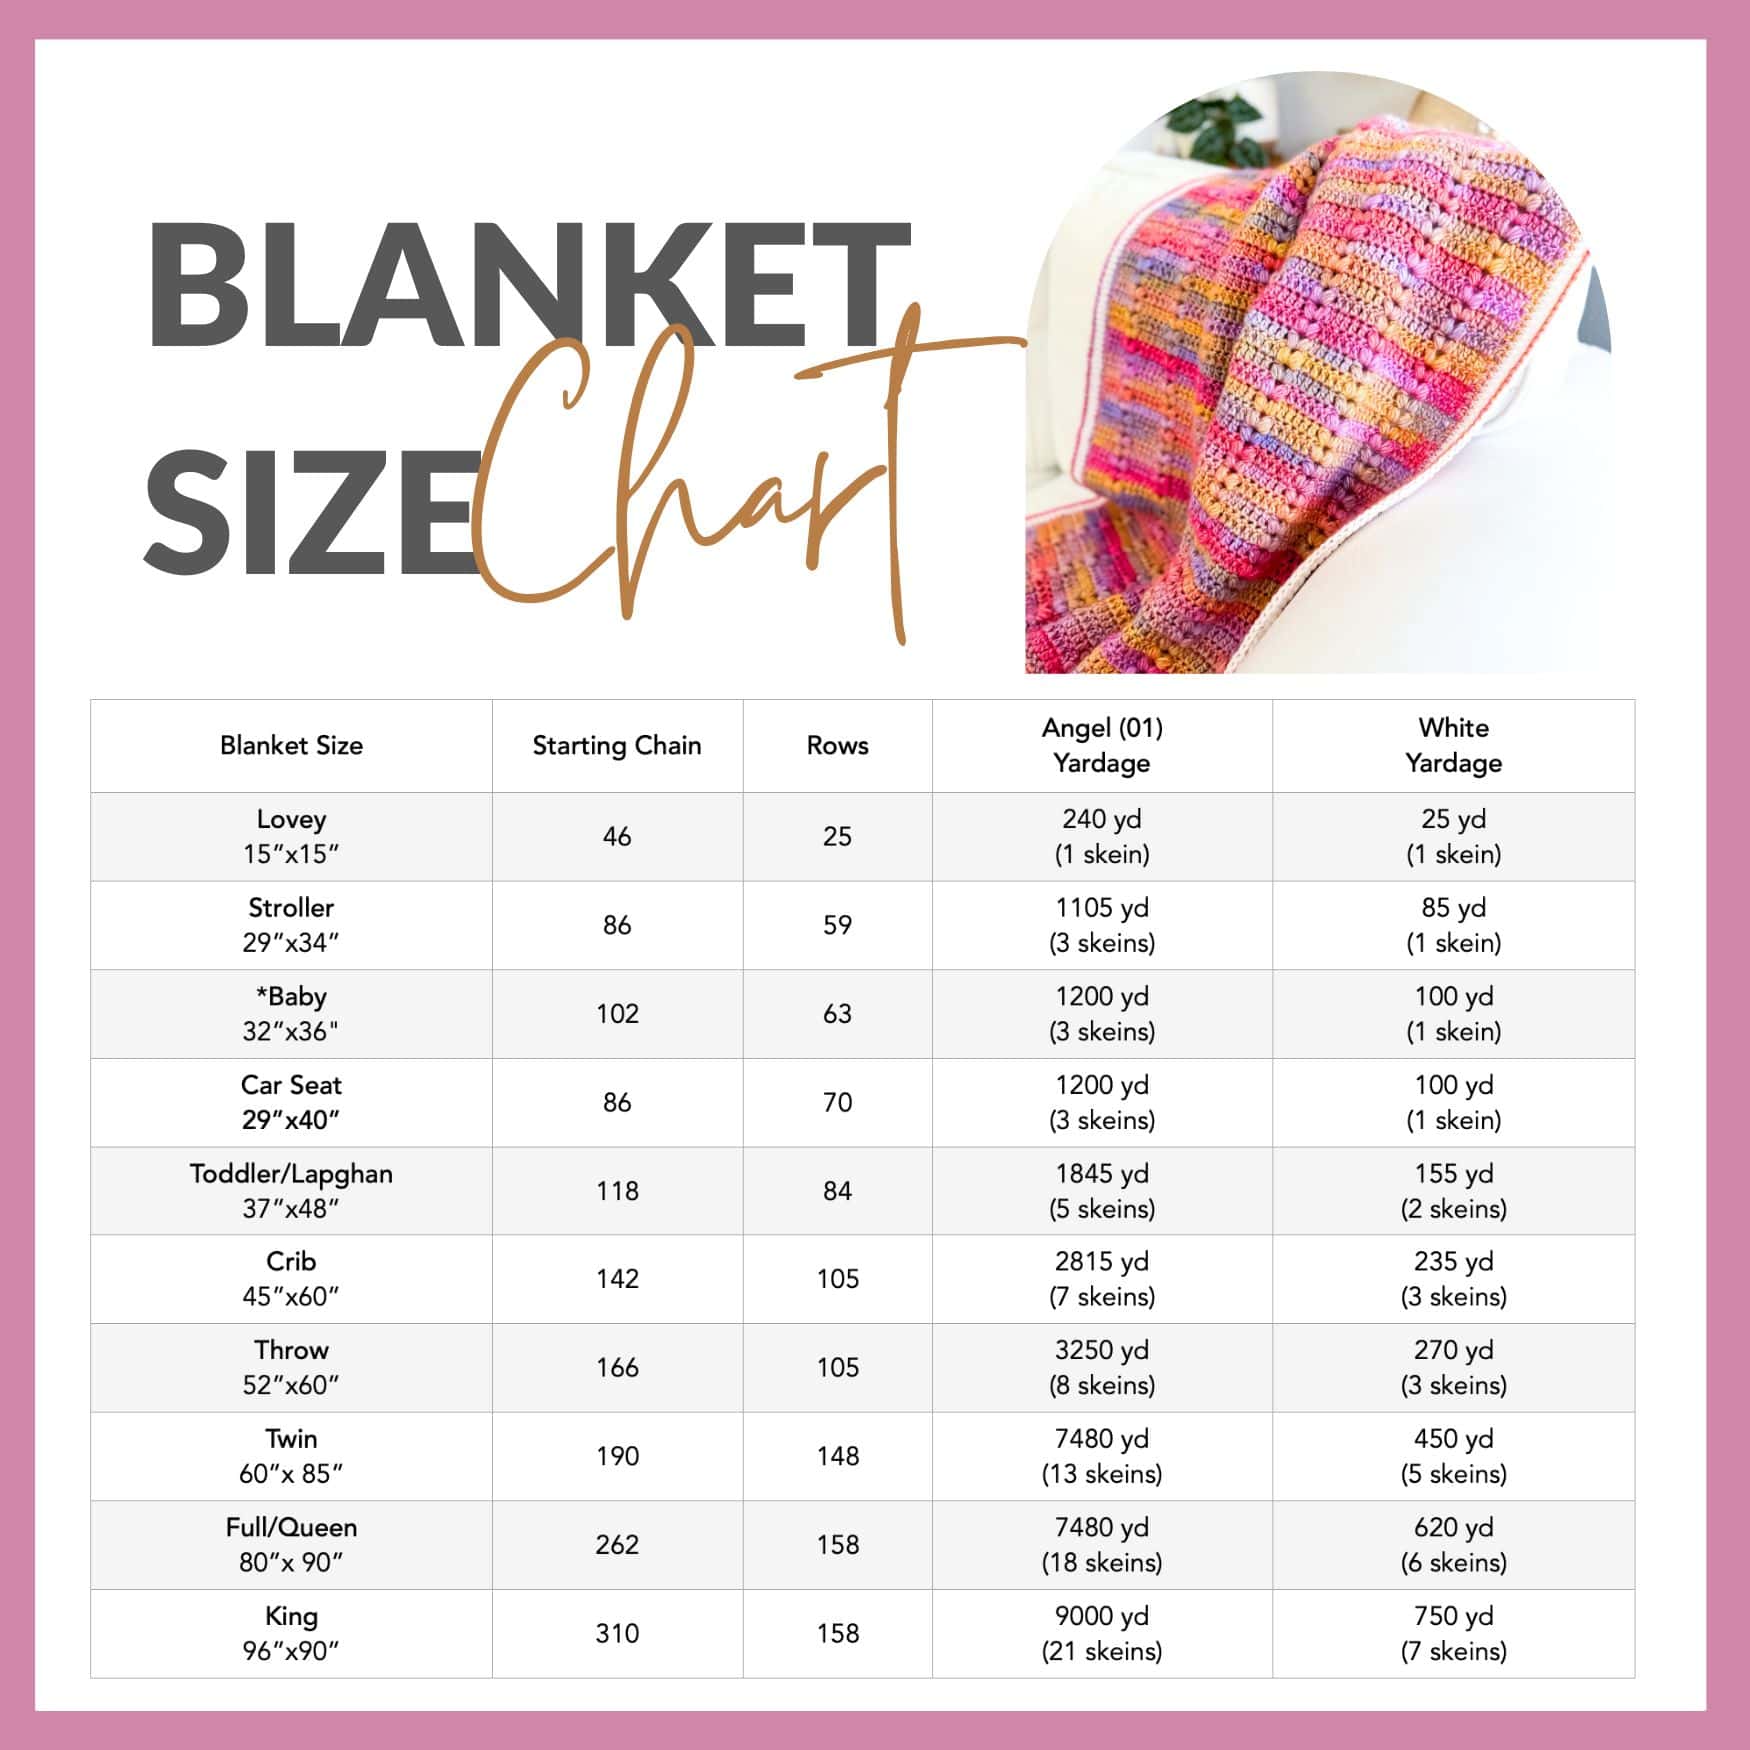
While I decided to crochet a baby blanket with this free pattern, I’ve also included ten other sizes ranging from lovey to king in case you want to make a larger project. There’s a chart letting you know all the details for each size, plus I’ll include information so you can make this crochet project any size you want.
I used a worsted weight, variegated yarn for my crochet baby blanket; but I think using a pretty solid or heathered yarn would be just as beautiful. It is possible to use a bulky weight yarn for this blanket, but just remember it will change the finished size of your final product.
If you’re ready to make this free crochet blanket pattern, grab your J crochet hook and some worsted weight yarn, and let’s get started! I hope you enjoy making it from the first stitch to the last!
If you’re not ready to crochet this blanket:
- Pin it later!
- Text a link to a friend who crochets!

Materials
- J/10 (6.00 mm) Crochet Hook
- Approximately 1300 yards of worsted-weight yarn
- Tapestry needle and scissors for weaving ends.
- The ad-free PDF of this pattern is available here if you prefer a print-friendly pattern.
Pattern Notes:
- The blanket shown is approximately 32”x36”
- 9 other sizes are provided at the end of the pattern.
- This pattern is written in US terms
- The turning chain does not count as a stitch in this project.
- If you crochet loosely, go down a hook size.
- Gauge is not important for this project.
- There is a video tutorial for this pattern if you find it hard to follow just written instructions. You can find it here.
Abbreviations:
- ch – chain
- sc – single crochet
- hdc – half double crochet
- dc – double crochet
- puff – puff stitch
- sl st – slip stitch
Special Stitch:
- Puff Stitch (puff): Video tutorial available here.
- Step 1: Yarn over, insert hook into stitch, and pull up a loop. (3 loops on hook)
- Step 2: Yarn over, insert hook into same stitch, and pull up a loop. (5 loops on hook)
- Step 3: Repeat step 2 twice. (9 loops on hook).
- Step 4: Yarn over, pull through the first 8 loops on hook (skip the last one).
- Step 5: yarn over, pull through remaining two loops.

The Happy Hearts Blanket Pattern
Chain 102.
Row 1: sc in the second st and in each st across. Ch 2, turn. (101 sc)
Row 2: dc in the first 5 stitches. *Skip the next st, (puff, ch 1, puff) in the next stitch, skip the next st. dc in the next 5 stitches* across. Ch 2, turn.
Row 3: dc in the first 5 stitches.. *skip the next st, (puff, ch 1, puff) in the ch-1 space, skip the next st. Dc in the next 5 stitches* across. Ch 2, turn.
Repeat row 3 for a total of 63 rows.
After your final row, don’t cut your yarn. Proceed to the border pattern.
Before working your border, you will have little “bumps” where the puff stitches pop out along the top of the blanket. Once you work your border you won’t notice that at all.

Border Instructions
For round one, continue from last row without turning.
Round 1: single crochet evenly around the entire blanket, working 3 sc in each corner. Sl st to the top of the first stitch to join. Cut yarn and weave ends.
Note: work 2 sc into the sides (“raw edges”) of each row. Along the top of the blanket, work 1 sc into each double crochet, each puff stitch, and each chain one space across.
Round 2: Join white yarn with a slip stitch and ch 1. hdc evenly around the entire blanket, working (hdc, ch 1, hdc) in each corner. Sl st to the top of the first stitch to join.
Round 3: Ch 1. Hdc evenly around the entire blanket working (hdc, ch 1, hdc) in each corner. Sl st to the top of the first st to join. Cut yarn and weave ends.
Round 4: Join Angel with a sl st in any corner. Sl st around the entire blanket, working (s st, ch 1, sl st) in each corner. Sl st to the first st to join. Cut yarn and weave your loose ends.
Adjusting the Size of This Blanket

The chart gives 10 common sizes. The number of skeins given corresponds to the yarn I used for the pattern. If you choose to use a different yarn, please check the yardage per skein for your selected yarn to determine how many skeins you’ll need.
If you’d like to make this blanket a custom size, work your starting chain in multiples of 8 + 6 until you reach the width you like. After you figure out your starting chains, work through the pattern as described above.

Share Your Work
If you use this pattern for your next project, I’d love to see your progress! Feel free to share photos with me on Facebook or Instagram.

I love this pattern! I will become a first time Great-Grandmother to a little girl in February 2025! I’ve been looking at patterns to crochet her a blanket! I’ve made my Grandsons a baby blanket and I’ll do this as long as I can!
Thank you so very much!! ❤️
Love these thank you
This is beautiful and works up very quickly. Ill be donating very small premie sizes to the organization I volunteer with. We donate kits to hospitals for families with a baby born too soon. I hope this is ok to do. Thank you!
This is so adorable 🥰 The color combo and the hearts makes this a must make! Thank you so much!
Looks beautiful just done a sample.goi g to make a throw for the bottom of my new bed.
I am making a runner for the bottom of my bed..
Ran out of wool Hayfield bonus glitter stargazer….but have manager to get a plain navy very simlar without glitter.
So…have decided to make a border in this but need to make it at least 3 inches..do you think this would work..
Lovecthe pattern thankyou
Hi there. Are you asking about how to make a border using this stitch? Or are you wondering about increasing the size of the border I’ve included?
If the first, I haven’t made a border using this stitch, but I’d say it would add a little less than an inch per round.
If you’re talking about adding 3″ border to this particular pattern, I’d just follow the border instructions in the pattern but work a few extra rounds 🙂
Hope this helps!
Can I make shawl with this pattern? Thanks
I think it would make a beautiful shawl!
Wow this looks so lovely. Wonder if my fingers yarn and hook can do it
You can do it, Tracy!! 🙂