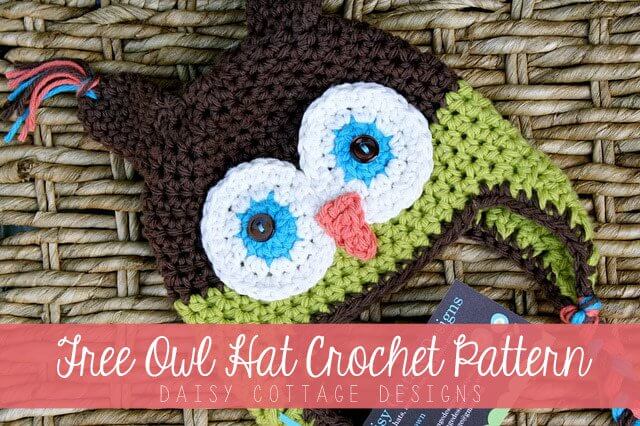
Free Owl Hat Crochet Pattern

After making so many changes to owl hat patterns I’ve purchased on Etsy, I’ve finally come up with my own free owl hat crochet pattern that doesn’t resemble them at all (although the eyes are similar… how many ways are there to crochet circles?). Right now, I’ve only written the newborn size, so I’m offering it free on my blog. In the future, I’d love to write and sell some patterns on Etsy, but we’ll just have to see how that goes. Of course, if you don’t crochet, you can always purchase one from my Etsy shop :).
All sizes are now available in the Daisy Cottage Designs shop. It’s a slightly different pattern, but it’s the one I use for all of my owl hats in the shop 🙂
This hat should fit babies whose heads measure between 13 and 15 inches.
Materials:
-Worsted weight yarn (I used Lily Sugar ‘n’ Cream Hot Green, Warm Brown, Tangerine, and
Hot Blue
)
–J hook (or whatever size necessary to achieve correct size)
–H hook for eyes
-Buttons for eyes
Pattern Notes:
Pattern is worked through both loops.
This pattern is worked in spiral until you reach the earflaps There will be no chains or slipstitches at the ends of a round unless otherwise noted.
Newborn:
This hat should fit babies whose heads measure between 13 and 15 inches.
Directions for Hat:
Ch 2.
Round 1: 12 HDC in second chain from hook. (12)
Round 2: *1 HDC in the next stitch, 2 HDC in the next stitch* around. (18)
Round 3: *1 HDC in the next 2 stitches, 2 HDC in the next stitch* around. (24)
Round 4: *1 HDC in the next 3 stitches, 2 HDC in the next stitch* around. (30)
Round 5: *1 HDC in the next 4 stitches, 2 HDC in the next stitch* around. (36)
Round 6: *1 HDC in the next 11 stitches, 2 HDC in the next stitch* around. (39)
Rounds 7-9: HDC in each stitch around. (39)
Round 10: HDC in each stitch around. Sl st in next. (39) Join a new color in the same stitch as the sl st.
Round 11: Ch 1., HDC in the next stitch and in each stitch around with the new color.
Rounds 12-14: HDC in the next stitch and in each stitch around. On round 14, sl st in next.
Stop here for a beanie and add one round of SC. If you’d like earflaps, keep going. I don’t chain at the end of a row. I work the first HDC of the next row in the last HDC of the previous row. If it makes you nervous to skip the chains, you can replace the first HDC of each row with 2 chains.
Round 15: 1 HDC in each of the next 10 stitches.
Round 16: Turn. 1 HDC in each stitch across.
Round 17: HDC decrease, HDC across to last two stitches, HDC decrease in last two stitches. (8)
Round 18: Turn. 1 HDC in each stitch across
Round 19: HDC decrease, HDC across to last two stitches, HDC decrease in last two stitches. (6)
Round 20: HDC in each stitch across. (6)
Round 21: HDC decrease, HDC across to last two stitches, HDC decrease in last two stitches. (4)
Round 22: HDC decrease, HDC across to last two stitches, HDC decrease in last two stitches (2).
I leave 8 stitches between the earflaps in the back and 11 between them in the front. You can play around with this and decide how you like them spaced.
Round 23: Single crochet around the entire hat.
Cut yarn and weave ends.
Facial Features (Leave long tails for sewing on):
Eyes (Make 2). Use an H hook.
Ch 3.
Round 1: 9 DC into the third ch from hook. Sl st in the first double crochet (not the chain 2).
Round 2: Ch 1, HDC in the same stitch. 2 HDC in each stitch around. I work in one extra HDC so I can sl st in the first HDC rather than in the ch.
Round 3: Ch 1, HDC in the same stitch *1 HDC in the next stitch, 2 HDC in the next* around.
Fasten off and weave ends. Sew a button in the center.
Beak:
Ch 6.
Row 1: 1 sc in second ch from hook, HDC in next, DC in next, DC in next, TC in next. Fasten off.
Ears:
Ch 2.
Round 1: Work 5 SC in the second ch from hook. (5)
Round 2: 2 SC in each stitch. (10)
Round 3 –8: SC in each stitch around.
Fasten off and sew on hat.

http://i.imgur.com/dsQ08pr.jpg – Made these for a friend of mine that lives in Australia. He had them made for his coworker that was having a baby, so I made one a little bit bigger than the other so they could wear it a littler longer as they grew. 🙂 I did put the buttons on the white one after the picture. xD<br /><br />http://i.imgur.com/y4IkZIk.jpg – This one I made for someone in town that
The pattern was very easy to follow and the made up very nice, Perfect baby gift. Thank youfor sharing.